Showing posts with label Meatless. Show all posts

Monday, August 9, 2010

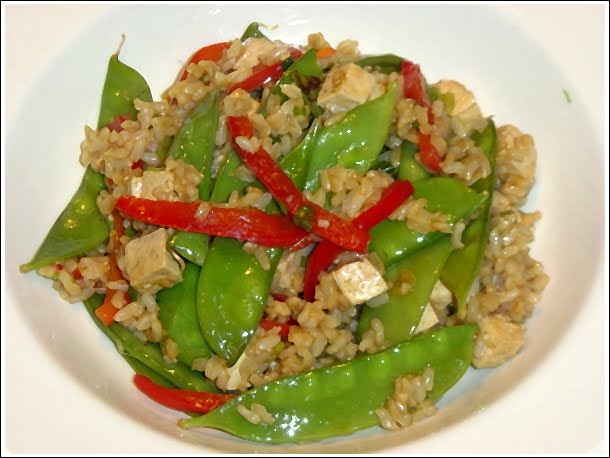
Veggie Fried Rice With Tofu

This excellent vegetable fried rice recipe comes from one of the many Moosewood cookbooks, I'm not sure which one though, because it is not one of the ones that I own. The recipe was passed to me from my friend John, who as I may have mentioned before, is no slouch in the kitchen, and is considered (by me) to be one of the most reliable recommenders of recipes (or practically anything else) around these here parts. Red peppers and snow peas provide crunch and color, while a sweet/salty/sour/spicy tofu marinade packs a flavorful punch. Relatively light on the prep, this recipe comes together extremely quickly once the cooking starts, and is substantial enough to stand on its own as a meal.

This recipe calls for 4 cups of cooked brown rice. When making fried rice, it is customary to use day-old or leftover rice, which has had time to shed excess moisture. If you try to make fried rice with fresh rice, you will almost certainly end up with too much moisture in the pan and a mushy result. With a little foresight, this should never be a problem. Cooked brown rice freezes exceptionally well, so next time you make a batch, double it and freeze the leftover in a 4 cup portion. You'll be good to go when the urge for fried rice hits you. Just don't forget to defrost it first. If you don't have any frozen rice, just make a batch the day before you plan on cooking. Check out some other great fried rice tips, and another great recipe, at Simply Recipes.
______________________________

First, make the tofu marinade by blending minced ginger root, minced garlic, soy sauce, rice vinegar, brown sugar, dark sesame oil, and chili paste/chili oil/chili sauce in a small bowl. Chop the tofu into 1/2 inch cubes and add it to the marinade, stirring gently. Prep the rest of the vegetables before you start cooking.


Heat a few tablespoons of oil in a large skillet, then add the peppers and cook for a few minutes before adding the snow peas along with some water. This is allowed to cook for a few minutes until the water evaporates and the vegetables are tender, but still retain some crispness.


Remove the tofu from the marinade and add it to the skillet, stirring to combine with the vegetables. Add the rice and heat thoroughly. Last, stir in the leftover marinade along with the scallions and you're all done.

______________________________

Veggie Fried Rice With Tofu (adapted from a Moosewood cookbook)
Serves 4 as a small main or 6 as a side - about 30-40 minutes

Marinade
  • 1 Tbsp minced ginger root
  • 4 garlic cloves, minced
  • 1/4 cup soy sauce
  • 2 Tbsp rice vinegar
  • 2 tsp brown sugar
  • 2 Tbsp dark sesame oil
  • 1 tsp chili sauce OR 1/2 tsp chili paste OR a splash of chili oil
  • 1 lb of extra-firm tofu
  • 3 Tbsp peanut or vegetable oil
  • 2 medium red peppers, cut into thin strips
  • 6 ounces snow peas, stemmed
  • 1/4 cup water
  • 4 cups cooked brown rice
  • 2/3 cup chopped scallions
  • chopped toasted almonds or pecans (optional)
  1. In a small bowl, combine marinade ingredients and mix well
  2. Cut tofu into 1/2 inch cubes and add to marinade, stirring gently
  3. Prepare the remaining ingredients (slice peppers, trim peas, chop scallions, measure rice)
  4. Heat oil in large skillet over medium high heat for 3 to 4 minutes, oil should be shimmering but not smoking
  5. Add the peppers and stir fry for 3 minutes
  6. Add the snow peas and water and continue to cook until water has evaporated, about 3 more minutes - the vegetables should be somewhat tender, but retain some crispness
  7. Remove the tofu from the marinade with a slotted spoon, and stir it into the skillet
  8. Add the rice and heat thoroughly, about 3 minutes
  9. Pour on the leftover marinade, add the scallions, and stir to combine
  10. Serve immediately garnished with the chopped nuts if you choose to use them

Tuesday, January 26, 2010

Curried Squash and Lentil Stew

I had a beautiful, three pound butternut squash sitting on my counter for about a month. It was the last item we purchased at the local farm before it closed for the winter, and for weeks I never seemed to be able to work it into a meal. I think that my subconscious mind was just in denial that the farm was closed until the spring, and that somehow, by preventing me from using the squash and having it sit on the counter instead, it was almost as if the farm never closed at all. But alas, my conscious mind won out, the farm is indeed closed, and the squash had to be used.

New Year's day provided the perfect opportunity. I was already planning on roasting a pork shoulder (great recipe here), and I had some leftovers from a baked pasta/sausage and peppers combo I had made a few days prior, but was looking for a vegetarian option to round out the menu. Perhaps a soup utilizing squash and lentils? A quick search on the internet yielded this recipe, which seemed to be just what I was looking for. After reading through the comments, I made a few modifications, namely increasing the curry powder and garlic, decreasing the amount of liquid by half, and adding in some chili powder and shredded coconut. Oh, and I left out the ginger, because I really don't like ginger. The finished product was a thick lentil stew, sweetened by the squash, with the the coconut providing a really nice reinforcing accent to the curry flavor. It was definitely a hit, and I've already made it again, although sadly, I had to get the squash at the supermarket.
______________________________

This is a very easy recipe. All the work is in the prep. Once everything is chopped, you heat the oil/butter in a large pot until the butter stops foaming, then add the onions, squash, carrots, celery, garlic, and salt then cook for about 15 minutes. Stir in the curry powder and chili powder and stir for a few minutes, then stir in the lentils and coconut.


At this point, add the stock and simmer, covered, until the lentils are cooked. The recipe suggests serving over basmati rice, but I haven't done this yet as the stew is pretty hearty on its own. I also haven't tried the cilantro oil, because I don't like cilantro. The second time I made this recipe, I found it to be at its best on the third day. If you like your stew more like soup, just add more stock (the original recipe calls for twice what I used).

______________________________


Curried Squash and Lentil Soup (adapted from Epicurious)
Serves 8 as a main course - 1 1/2 hours start to finish
  • 6 TBS vegetable oil
  • 4 TBS unsalted butter
  • 3 lb butternut squash, peeled and cut in 1/2 inch pieces
  • 2 medium onions, chopped
  • 2 carrots, chopped
  • 2 celery ribs, chopped
  • 8 cloves garlic, minced
  • 2 tsp salt
  • 3 TBS curry powder
  • 1 tsp chili powder
  • 1/2 tsp black pepper
  • 2 cups lentils
  • 1/2 cup shredded coconut
  • 1 quart water
  • 1 quart vegetable stock
  • 2 tsp fresh lemon juice
  1. Heat oil with butter in large pot over medium heat until foam subsides
  2. Add squash, onion, carrot, celery, garlic, and 2 tsp salt to pot, cook, stirring occasionally, until vegetables are softened and beginning to brown, 15 to 20 minutes
  3. Stir in the curry powder, chili powder, 1/2 tsp black pepper, and cook, stirring frequently for 2 minutes
  4. Stir in the lentils and coconut, then add the water/stock and bring to a simmer
  5. Cover pot and cook until lentils are tender, 25 to 40 minutes
  6. Stir in lemon juice and season with salt and pepper

Wednesday, January 13, 2010

Mushroom Barley Stew

The frigid heart of winter is a time for stew. Combining the heartiness of a meal, with the warm deliciousness of soup, there's nothing quite like a bowl of stew on a cold day. Just imagine hearty chunks of potato, earthy mushrooms, some carrots for sweetness, the chewy toothsomeness of barley, all in a rich broth with hints of sage...(this is starting to sound like a Chunky Soup commercial)...sounds good, right? This is a great recipe to make on a Sunday afternoon, then stow away in the fridge for easy weeknight meals, or even weekday lunches. As with pretty much all soups and stews, this one is definitely better the next day. Serve with some nice warm crusty bread, or fresh baked biscuits, and you'll want for nothing on those frigid winter nights.
______________________________

This recipe really couldn't be easier. Prep all the ingredients then heat the oil in large (at least 5 quart) pot over medium heat. Add onion, carrot, celery, garlic, potatoes, sage, salt and pepper.


Cook until the veggies start to brown, stir in the mushrooms and cook an additional 5 minutes. Add the barley, and cook, stirring frequently for 2 more minutes. Add the stock and/or water, bring to boil, reduce heat, cover and simmer for 30 more minutes. Salt and pepper to taste and voila! Stew!

Don't like barley? Try brown rice, quinoa, wheat berries, couscous, bulgur, or whatever grain suits your fancy. Feel free to experiment with herbs as well, substituting rosemary or thyme for the sage, or use them in combination. Not a mushroom eater? Leave em' out. Try some butternut squash or sweet potato in there. So many possibilities!
______________________________

Mushroom Barley Stew (~1 hour 15 minutes - 6 to 8 large servings)
  • 4 TBS olive oil
  • 2 cups chopped onion
  • 4 medium waxy potatoes, peeled and cut into chunks (cut lengthwise into quarters, cut each quarter into 3 pieces)
  • 4 ribs celery, chopped
  • 4 carrots, peeled, halved lengthwise, and chopped into chunks
  • 8 cloves garlic, peeled
  • 1 tsp dried sage
  • 1/2 teaspoon salt
  • 1/2 teaspoon fresh ground black pepper
  • 4 cups sliced mushrooms (any type, I like a combo of baby bella and button)
  • 2/3 cup uncooked pearled barley
  • 6 cups vegetable stock (can use water, or a water/stock combo)
  1. Heat oil in large pot over medium heat (pot should be at least 5 quarts)
  2. When oil shimmers, add onion, potato, celery, carrot, garlic, sage, salt, and pepper
  3. Stir to combine and cook, stirring occasionally, until the vegetables start to brown, about 10 minutes
  4. Stir in the mushrooms and cook for 5 more minutes
  5. Stir in the barley and cook, stirring frequently, for 2 minutes
  6. Add the stock/water, raise the heat, and bring to a boil
  7. Lower heat, cover and simmer for 30 minutes
  8. Taste then season with additional salt* and pepper to taste
*If you used water or a homemade stock that is low on salt, you might need to add as much as a teaspoon or more of salt (add 1/4 teaspoon at a time, tasting as you go). Store-bought stocks are often quite high in salt, so taste and go from there.

Saturday, April 11, 2009

Braised Escarole with Garlic and Oil

The other day I was faced with a head of escarole, a leftover ingredient from a pot of soup that I never made, that I had no idea what to do with. Roasted chicken sandwiches were already on the menu for dinner, so I figured I could easily turn the escarole into a side of some sort. My wife told me that her grandmother likes to saute escarole with a bit of oil and garlic (knowing her grandmother, I'm sure it is actually WAY MORE than a bit) and that it comes out bitter, but that's the way grandma likes it. I was into the oil and garlic, but not so much the bitter. After looking through a few recipes online, I decided that I would go with a quick braise, which hopefully would result in nice soft (but not mushy) greens, without me having to worry about burning garlic over a longer cooking time. Since I was having chicken, I chose chicken broth as a braising liquid. I decided to add some onions for a little sweetness to balance the bitterness of the escarole, and a little crushed red pepper for a touch of heat. It all came together quite nicely. In a moment of inspiration, I did what my dad would probably do, and ended up putting the escarole on the sandwich, which was really nice.

I liked it so much that I bought two more heads the next day and made it to accompany the turkey burgers I was having. I can imagine this would be great stirred into some pasta with a little grated cheese, or with some sausage on a roll, or maybe with some cannellini beans...
______________________________

Start by cutting, washing well, and drying the escarole. Heat the oil over medium for a few minutes, then saute the onion, garlic, and red pepper for a few minutes.


Add the escarole and braising liquid, stir to combine, cover and cook for 15 minutes. Give it a stir and it is ready to go.


Makes a great side or sandwich topping.

______________________________

Braised Escarole with Oil and Garlic
About 30 minutes - Serves 2 to 4 as a side
  • 1 large head escarole, washed, dried, and cut into 2 inch pieces
  • 3 tablespoons extra virgin olive oil
  • 3 garlic cloves, minced or pressed
  • 1/2 of a medium red onion, thinly sliced
  • 1 teaspoon crushed red pepper flakes
  • 1 cup chicken broth (or vegetable broth, dry white wine, etc.)
  • salt to taste
  1. Heat the oil in a large saucepan over medium heat for 5 minutes, until it shimmers but is not smoking
  2. Add the onions, garlic, and red pepper and saute for 3 minutes
  3. Add the escarole and chicken broth, stirring to combine ingredients
  4. Cover the pot and cook for 15 minutes
  5. Remove the cover, stir, salt to taste and serve
Use a non-meat based braising liquid for an all-veggie version of this recipe.

If you would like the escarole to be a bit drier, uncover after 10 minutes and cook for the last 5 minutes uncovered to boil off some of the remaining liquid.

Tuesday, March 24, 2009

Falafel and Pita

There were three lunch trucks outside the library where I worked in college, one of which was affectionately known as the "Greek Truck." I am pretty sure that this had to do with the fact that they had gyros and a big Greek guy, who whenever you would order anything with the works, would yell into the back of the truck to whomever was working the grill, "Give me a gyro all the way!" From this man I had my first pita with hummus, sprouts, and cucumber and I was hooked right away. Soon after I had my first falafel, and all was right with the world. Now anything on a pita always makes me think of that lunch truck and the man who taught me that it's not pronounced "jahy-ro," but "jeer-oh."

I have made a few pita recipes over the past year or so with pretty good results, but I have tried a different recipe pretty much every time. Recently, when I saw a post about pita on the Smitten Kitchen blog, I knew that I had yet another new recipe to test. Now, what to put in the pita once they were baked? Falafel sounded good to me, so I decided to try my hand at frying some up. Except for one somewhat failed attempt many years ago at one of my first all-veggie meals to try and impress my new fiance (she married me anyway so I guess those falafel couldn't have been too bad), I have never made falafel at home. I perused a few recipes and settled on this one from Mark Bittman.

The pita recipe worked beautifully. The dough was very easy to work with and the pita puffed nicely in the oven.

Now I think I'm finally ready to take the plunge, settle down, and commit to a pita recipe.

The falafel were very good as well. I cut down the cayenne in the recipe by half and forgot to add the onion, although I don't think the falafel were any worse for it. I am definitely going to be making this recipe again as well. I prefer a light, tangy yogurt sauce on my falafel rather than a tahini-based sauce. I just combined some yogurt with a bit of lemon juice, some minced garlic, and a dash of salt, pepper, and cumin. Delicious!

All I can say is, "Give me a falafel, all the way!"
______________________________

Pita Bread Recipe from Smitten Kitchen

Falafel Recipe from Mark Bittman's Bitten Blog

Saturday, March 21, 2009

Brown Rice and Black Bean Soft Tacos

A few weeks ago I inadvertently recreated one of my old favorite fast food items. I had not eaten anything from any fast food restaurant in at least 5 years, probably even longer, but nonetheless I found myself experiencing a bit of food déjà vu. I was pretty sure I had never made a burrito (actually it was more of a taco due to over-stuffing) with this exact combination of ingredients, but I knew I had eaten it before. Then it struck me, the Seven Layer Burrito from Taco Bell - rice, beans, sour cream, guacamole, cheddar cheese, lettuce, and tomato (I looked it up). Of course, my dinner was slightly different as I had mashed avocado rather than guacamole, crumbled goat cheese instead of cheddar, and salsa instead of tomato, but the essence remained the same. Fond fast food memories came flooding back, making me feel all nostalgic, as well as slightly nauseous, for times spent with good friends driving around and...well, eating at fast food restaurants.

The amazing technique for cooking the brown rice used in this recipe comes from Cook's Illustrated Magazine, and it has been a revelation for me. I know it sounds pathetic, but I have never been able to cook brown rice with any type of consistency. This technique has you bake the rice in the oven, which was completely new to me. I have made brown rice this way at least ten times now, and its always come out exactly the same, that is to say, absolutely perfect. I'll never simmer it on the stove top again. The only down side is that you need to start 1 hour and 20 minutes before you want to use the rice, so some planning ahead is definitely required. Alternatively you can make a large batch of rice in advance, and freeze it in smaller portions to defrost and reheat as needed.
______________________________

Start by preheating your oven to 375 degrees. Measure out 1 1/2 cups of brown rice into an 8-inch, oven safe baking dish. Measure out the spices and bring the water and oil to a boil.

Stir the spices into the boiling water and pour it over the rice. Pouring the water into the dish will move the rice around, so just use a spoon to coax it back into a nice even layer.

Cover tightly with a double layer of foil and place into the oven for 1 hour.

While the rice cooks, open up a can of black beans, rinse them and drain them well. When the rice is done, make sure to uncover it carefully or you can get a pretty nasty steam burn.

Fluff the rice with a fork, and place the foil loosely back over the top for 5 minutes.

While you are waiting for the rice, mash the avocado. You don't want to do this too far in advance because the avocado tends to discolor quickly. Stir the beans into the rice and allow it to sit uncovered for a few more minutes.

To assemble your soft tacos, start with a medium size (about 8 inch) flour tortilla. Spread as much sour cream as you like in the middle (I generally use about 1 tablespoon per taco).

Spoon approximately 1/8 of the rice mixture onto the sour cream and top with some goat cheese. I got the idea for goat cheese in tacos from this great recipe by Rick Bayless, the undisputed king of authentic Mexican cuisine in America. I know goat cheese sounds a little weird for tacos, but I think it adds a really nice tangy flavor and creaminess that you don't get from grated cheddar or jack cheese, but you can use whatever you like of course.

Next comes a little of your favorite salsa spooned over the top and a generous dollop of mashed avocado. If tomatoes are in season, I'm sure some fresh, diced tomato would be great, but if they're not in season, skip the tomato and use the salsa.

Top with some nice crispy romaine lettuce and you're ready to eat.

______________________________

Brown Rice and Black Bean Soft Tacos
1 hour 30 minutes (about 10 minutes if rice and beans is cooked in advance) Makes 8 to 10 tacos
  • 1 1/2 cups long grain brown rice
  • 2 1/3 cups water
  • 2 teaspoons vegetable oil
  • 1/2 teaspoon salt
  • 1 1/2 teaspoons chili powder
  • 1/2 teaspoon cumin
  • 1/2 teaspoon oregano
  • 1 15 ounce can black beans, rinsed and drained well
  • 8 to 10 flour tortillas
  • sour cream
  • 4 ripe avocados
  • crumbled goat cheese
  • your favorite salsa
  • romaine lettuce, washed, dried, and cut into bite size pieces
To make the rice and beans:
  1. Adjust oven rack to middle position and heat oven t0 375 degrees
  2. Place rice in 8-inch square, oven safe baking dish
  3. Place water and oil in small saucepan and bring to a boil
  4. Stir spices into boiling water
  5. Pour boiling water over rice, smooth rice into an even layer with a spoon
  6. Cover tightly with a double layer of foil
  7. Place into oven for 1 hour
  8. Remove from oven and carefully uncover
  9. Fluff rice with fork, then place foil loosely over top and allow rice to sit for 5 minutes
  10. Uncover, mix in beans with fork, and allow the rice to sit uncovered for 5 more minutes
To assemble the tacos:
  1. Prepare flour tortillas according to package directions
  2. Place a tortilla on a plate and spread about 1 tablespoon of sour cream evenly over the middle of the tortilla
  3. Place 1/8 to 1/10 of the rice and beans (about 1/2 cup) onto the tortilla
  4. Top the rice and beans with a few crumbles of goat cheese (about 1 to 2 tablespoons)
  5. Place a few spoons of salsa on top of the cheese (about 1 to 2 tablespoons)
  6. Top the salsa with a generous dollop of mashed avocado (about 1/3 cup or more if you like)
  7. Sprinkle a few pieces of lettuce on top
  8. Repeat as many times as you like
_______________________________

Brown rice is much healthier for you than white, but it takes considerably longer to prepare. The cooking method in this recipe makes delicious rice, is very simple, and is hands off for almost all of the cooking time leaving you free to prepare the rest of your meal. Use the brown rice cooking technique above whenever you need brown rice, simply omit the chili powder, cumin, oregano, and beans.

Tuesday, February 17, 2009

Baked Ziti

I hate baked ziti. I hate the dried out pasta tubes around the edges, the mush in the middle, the flavorless sauce, all topped with a plastic layer of cheese, that so often grace picnics, potlucks, birthday parties, etc. I've had so many delicious pasta dishes in my life, that I was perfectly willing to never give baked ziti another try. That is until the March 2009 issue of Cook's Illustrated showed up in the mail and I read this. The good people at Cooks promised me "perfectly al dente pasta, a rich and flavorful sauce, and melted cheese in every bite," and so I was willing to give baked ziti one last try. Even though I knew I was in good hands as Cook's meticulously tests their recipes with every possible trick and tweak until they get them just right, all my past ziti experiences cast a doubtful shadow over my mind (which was somewhat lifted with the help of some good red wine).


The verdict? I've spent the last two days trying to think of the next occasion that would give me a reason to make this dish again, it was that good. It was everything Cook's said it would be, and one of the better pasta dishes to ever come out of my kitchen. Sadly, it is both way too rich and unhealthy, and somewhat time consuming to prepare (about 2 1/2 hours from start to finish), to work its way into my regular meal rotation, but it definitely moves to the head of the class on the "special occasion" list.

Cook's requires you to subscribe to their site in order to get the recipes (if you're ever going to subscribe to anything, you really can't go wrong with Cook's Illustrated), but a little poking around and I found that somebody had posted the recipe on Recipezaar. There's just one mistake to note, it should be 4% fat cottage cheese, not 1%. Cook's recommends Hood brand cottage cheese, and whole milk mozzarella as opposed to part-skim (and warns not to use the pre-grated stuff). And just for me, use the ziti with lines (people, it's all about texture). So if you love baked ziti, I imagine you'll love this reworking of the recipe, and if you're a hater like me, then this might be the one that converts you.

Sunday, February 15, 2009

Spaghetti alla Boscaiola

I try a lot of different recipes that I find on the various food blogs that I read. Usually they are very good, but I just don't have time to write long blog posts detailing all of them. In the spirit of efficiency and being concise, I figured I could just past them along here on my blog.

Here's a nice quick pasta dish that I made this past Thursday night. It only involves a few ingredients, and although it's somewhat irritating to have to use 3 separate pots/pans, it's worth it in the end. If you like mushrooms, give this one a try.

Wednesday, February 11, 2009

Oven Roasted Breakfast Potatoes

I generally make my menu for the week and go food shopping on Saturday morning. Sometimes it's hard to figure out what I want to eat all week long, and I'm not always crazy about the idea of buying veggies and things on Saturday for a dish I'm not going to prepare until Friday, so I've been making "breakfast for dinner" for the past couple of Fridays. Nothing too fancy, a six-egg mushroom and cheese omelet, some sourdough or whole wheat toast, and some potatoes. I really like being able to come home at the end of the week and make a simple yet satisfying meal, and the thing that's really been making this meal has been the potatoes. Now I've extolled the virtues of potatoes with breakfast before, but I've refined my technique and seasoning a bit after trying many different recipes and cooking methods, and I think I've come up with something pretty good (and really easy).
______________________________

Start by preheating the oven to 400 degrees and cutting up some Russet potatoes into 3/4 inch cubes. I like to leave the skin on, but peeling the potatoes would be fine.

Season the potatoes with salt, black pepper, paprika, onion powder, and garlic powder. Mix in a little vegetable oil and spread the potatoes out on a baking sheet that has been generously coated with cooking spray.

Roast the potatoes on the center rack of the oven for 20 minutes. Remove the pan from the oven, flip the potatoes, and roast for another 20 minutes until the potatoes are nice and brown and crispy.

Serve immediately with your breakfast item of choice and a little ketchup.

______________________________

Oven Roasted Breakfast Potatoes
about 50 minutes - serves 4
  • 3 medium russet potatoes, washed well and dried
  • 3 teaspoons vegetable oil (I use canola)
  • 1 teaspoon salt
  • 1 teaspoon paprika
  • 1 teaspoon onion powder
  • 1 teaspoon garlic powder
  • 1/4 teaspoon ground black pepper
  1. Preheat oven to 400 degrees
  2. Cut potatoes into 3/4 inch cubes
  3. In large bowl, mix potatoes with salt, paprika, garlic powder, onion powder, black pepper, and oil until well coated
  4. Generously coat a non-stick sheet pan (1/2 sheet size) with cooking spray
  5. Spread the potatoes evenly on the sheet pan and place the pan on the center rack of the oven
  6. Roast for 20 minutes, flip the potatoes over, roast another 20 minutes until the potatoes are brown and crispy (roasting time may be extended 5 to 10 minutes for darker, crisper potatoes), serve immediately

Sunday, October 19, 2008

Portobello "Steak" and Cheese Sandwiches

A few weeks ago a friend of mine was coming over for dinner. When I asked him what he would like, he thought that some type of sandwich would be good. I am up for sandwiches anytime, so I immediately liked the idea. Possibilities began flying through my mind and I began to crave steak and cheese with sauteed peppers and onions (commonly called a "cheesesteak"). The only problem here is that my wife doesn't eat beef, so I would either have to make some chicken as well or convince her to settle for a pepper and onion sandwich. I also remembered that this particular friend is trying to cut down his red meat consumption, so he might not want steak and cheese. As I mentioned these things to him, he reminded me about a portobello mushroom sandwich I had made one time in the past, which was basically a grilled portobello cap with some balsamic vinegar and mozzarella cheese on a nice roll, and the wheels started to turn in my mind. I figured I could replace the steak with thick slices of sauteed portobello mushroom, keep everything else the same, and make everybody happy (except possibly myself). The sandwich would be healthier for certain, and eventhough I was a little skeptical that it would satisfy my craving, I enthusiastically went forward.

I had recently made an Italian bread recipe that was absolutely incredible, and I figured it would make equally incredible sub rolls. Luckily I had the day off from school in observance of Yom Kippur, which gave me some extra time for a little baking (okay, a lot of baking, some sourdough loaves, multigrain bread, and a quadruple batch of brownies in addition to my sub rolls, which are across the bottom of the rack in the picture).

So basically all I did was slice up a few peppers and onions, then saute them in a little oil over pretty high heat until the onions were soft and browned a little bit. Then I sauteed the sliced portobellos until they were tender. I put the veggies in a baking dish and covered it with foil until I was ready to make the sandwiches. In the meantime, I made some oven fries. When I was ready to make the sandwiches, I just heated a nonstick pan, put down some mushrooms, covered them with a generous portion of peppers and onions, and topped that with some provolone cheese. When the cheese melted, I slid the pile of veggies onto a roll, spread a little mayo on the top, and that was it.

The result? An incredibly good veggie version of a steak and cheese sandwich. I was extremely satisfied. The melted cheese mixes with the mayo and juices from the vegetables which begin to soak into the bread creating one of those whole is greater than the sum of the parts experiences. I honestly did not miss the steak at all. I will definitely be making these sandwiches again.
______________________________

Portobello "Steak" and Cheese Sandwiches
About 30 minutes - Serves 4

It's my belief that your sandwich is only as good as the bread you put it on, so don't skimp on the rolls. If you're not into baking your own, make sure you get some rolls from a bakery or a good deli that makes their own.

Saute the mushrooms, peppers, and onions in advance and you can then put these sandwiches together in about 5 minutes whenever you're ready to eat.

I love mayo and provolone, but if you don't like one or either of these, of course feel free to substitute cheeses and condiments as you like.
  • 24 ounces of portobello musroom caps (about 10 caps), sliced 1/4 inch thick
  • 2 onions, sliced thin
  • 2 green peppers, cored, seeded and sliced into thin strips
  • 8 slices of provolone cheese
  • Mayonaise
  • Olive oil
  • Salt and pepper to taste
  • 4 sub rolls
  1. Heat 1 tablespoon of olive oil in a large non-stick skillet over medium-high heat until the oil starts to shimmer
  2. Saute the onions and peppers, tossing occasionally, until they have softened considerably and the onions start to brown, approximately 6 to 10 minutes, remove them from the pan to a dish and cover
  3. Add 1 tablespoon of oil to the pan, add the mushrooms and sprinkle with salt and pepper, then saute the mushroom slices, tossing occasionally until they become tender, about 5 minutes, remove them from the pan to the dish with the onions and peppers and cover until you are ready to make the sandwiches
  4. When you're ready to make the sandwiches, slice your rolls and spread mayonaise on both sides (as little or as much as you like) and heat a non-stick skillet over medium heat
  5. Place 1/4 of the portobellas in the pan, top with 1/4 of the peppers and onions, salt and pepper to taste, and top all the veggies with 2 slices of provolone cheese
  6. When the cheese melts, use a large spatula to transfer everything to a roll
  7. Repeat with the rest of the ingredients to make 3 more sandwiches

Thursday, October 9, 2008

Chick Pea and Artichoke Heart Stew

Since school started my weekday cooking time has been severely cut down. To compensate, I've been making a double recipe of a different soup or stew every weekend since the beginning of September. The soup gets better and better as the week goes on, and I don't have to worry about cooking dinner when I get home from cross country practice. A nice bowl of soup with a few slices of bread makes a perfect weeknight meal with very little clean up, which is key when the kids need baths, stories, etc...

Chick Pea and Artichoke Heart Stew is one of my (and my wife's) favorites. This is another one of those recipes that was passed my way by my friend John, who got it from the Moosewood Restaurant Cooks at Home cookbook. Brimming with chick peas, chunks of potato, and artichoke hearts, this is definitely hearty enough to make a meal. Turmeric gives it a wonderful golden color, and combined with sweet paprika, a deep, earthy taste. A sprig of fresh rosemary and some fresh sage round out the aroma of this stew quite nicely. It's actually quick enough to make on a weeknight, as it only takes about 30 minutes from start to finish, but as with most soups and stews, if you take the time to make it ahead, the flavors have time to meld so the soup tastes even better when reheated. I suggest doubling the recipe so you have plenty of leftovers.

The recipe calls for water or stock, but I prefer the extra flavor you get when you start with stock. I'll still use store bought stock in a pinch, but when I have the time, I like to make my own. There are many advantages to doing this. Here's three: First, it's cheaper than buying ready made, second, you can control the amount of salt (since most prepared stock is absolutely loaded with sodium, even the low sodium varieties), and third, it tastes significantly better. What else do you want? I've included a recipe for a quick vegetable stock that is a slightly modified version of a stock recipe from Super Natural Cooking by Heidi Swanson, creator of the excellent food blog 101 Cookbooks.
______________________________

Vegetable stock can be complex or relatively simple. Basically all you need is some aromatic vegetables, some fresh herbs, and some water. This stock is at the very simple end of the spectrum. The only required ingredients are onion, garlic, celery, thyme, water, and salt. In this version I've added some fresh parsley and carrot, but they are by no means required. Start by chopping the vegetables into large chunks and heating a small amount of olive oil in a large pot.

Dump all the vegetables in the pot and stir them around. Let them sit for a minute or two and stir them again, keep doing this until the vegetables look like they are starting to soften.

Once the vegetables are starting to soften, let them sit in the pan without stirring them for about 5 minutes or so. The goal here is to develop some brown bits (kind of faux vegetable fond) on the bottom of the pan that you can scrape up when you add the water. These caramelized bits will give the stock a deeper flavor in addition to a darker color. Once you have some nice brown bits, add the water and salt.

Bring to a boil, then lower the heat, cover, and simmer for one hour.

Strain the stock, pressing down on the vegetables to extract as much fluid as possible. Since this is a meatless stock the only fat is from the olive oil, so you don't have to do any skimming or other type of fat removal. The stock can be used immediately, stored in the fridge for up to a week, or frozen.

______________________________

The making of this stew goes quick, so prepping all the ingredients in advance is a good idea. One of the ingredients is pureed squash, and the recipe suggests using a jar of squash baby food which is what I have done every time I have made this recipe. It seems easier to me than cooking and pureeing just 1/2 cup of squash or sweet potato. When you're ready to start, heat the olive oil in a large pot over medium heat until it shimmers, add the onion and garlic and saute until soft.

While the onions and garlic are cooking, bring the water or stock to a simmer. Add the turmeric and paprika to the softened onions.

Add the potatoes, rosemary, sage and then the simmering water or stock.

Bring the stew to a simmer and cook until the potatoes are soft, about 12 minutes or so. At this point you remove the rosemary sprig, add all the rest of the ingredients (pureed squash, chick peas, artichoke hearts), taste, and season with salt and pepper. Return the soup to a simmer and allow the flavors to mingle for a few minutes and you're done.

______________________________

Vegetable Stock (adapted from Super Natural Cooking)
About 1 hour and 30 minutes - makes approximately 8 cups
  • 1 tablespoon olive oil
  • 3 large onions, cut into eighths
  • 1 clove garlic, peeled and smashed
  • 2 ribs of celery, chopped into large pieces
  • 5 sprigs of fresh thyme
  • 8 cups of water
  • 2 teaspoons of table salt (can be reduced or increased to taste)
  • 2 large carrots, chopped into large pieces (optional)
  • a handful of fresh parsley (optional)
  1. Heat the oil in a large pot over medium heat until it shimmers
  2. Add all the vegetables and herbs to the pot and stir
  3. Stir every minute or so until the vegetables start to soften, about 6 minutes total
  4. Let the vegetables sit without stirring until brown bits begin to form on the bottom of the pot, about 5 minutes
  5. Add the water and salt, stir and scrape the bottom of the pot to loosen any brown bits
  6. Bring to a boil, lower the heat, cover, and simmer for one hour
  7. Strain the stock pressing down on the vegetables in order to remove as much liquid as possible
______________________________

Chick Pea and Artichoke Heart Stew (from Moosewood Restaurant Cooks at Home)
About 30 minutes - serves 4 to 6
  • 4 cups water or vegetable stock
  • 2 medium onions, chopped (about 1 1/2 cups)
  • 2 garlic cloves, minced or pressed
  • 2 tablespoons olive oil
  • 1 teaspoon turmeric
  • 1 teaspoon sweet paprika
  • 4 medium waxy skinned potatoes, peeled and cut into 1/2 inch cubes
  • 1 sprig fresh rosemary
  • 5 leaves fresh sage, minced
  • 4.5 ounce jar pureed squash baby food or 1/2 cup pureed winter squash or sweet potato
  • 3 cups drained cooked chick peas (two 15 ounce cans)
  • 1 1/2 cups drained quartered artichoke hearts (one 14 ounce can)
  • Salt and ground black pepper to taste
  • lemon wedges (optional)
  • grated Pecorino Romano or Parmesan cheese (optional)
  1. Bring the water or vegetable stock to a simmer
  2. Saute the onions and garlic in the oil until soft, about 6 to 8 minutes
  3. Stir in the turmeric and paprika, saute for 1 minute
  4. Add the potatoes, rosemary, sage, and water/stock
  5. Bring to a simmer and cook until potatoes are tender, about 12 minutes
  6. Stir in the pureed squash, add the chick peas and artichoke hearts, remove the rosemary
  7. Season with salt and pepper to taste
  8. Return the stew to a simmer for a few minutes to allow the flavors to meld
  9. Serve with lemon wedges and top with grated cheese if you wish

Saturday, August 30, 2008

The Caprese Sandwich

I've been waiting all year for fresh local tomatoes so I could enjoy what has become my absolute, number one favorite sandwich, the caprese. Based on the insalata caprese from the Campania region of Italy, the caprese sandwich is the ultimate example of how a few high quality ingredients can be combined simply to make something truly fantastic. All you need to make this amazing sandwich is a good loaf of crusty, chewy Italian style bread, some tomatoes, fresh mozzarella (preferably mozzarella di bufala), fresh basil leaves, extra virgin olive oil, and some salt and fresh ground pepper.

The key to this sandwich is making sure that you use the best possible ingredients, and that means waiting all year long until the end of summer when you can get the freshest, most delicious tomatoes at the peak of their season. Don't even think about trying to make this with bland, mealy, refrigerated supermarket tomatoes in the middle of winter, you'll regret it. Plus, that extra long wait makes the sandwich that much more special when you finally do have one, and the good thing is, we are in the peak of the tomato season right now! As soon as you're done reading this, I suggest you go get yourself some. Pair the sandwich with a simple salad and a glass of wine and you've got an amazingly light, refreshing, and incredibly tasty summer meal.
______________________________

Start with a good loaf of crusty bread, like rustic bread, and cut it in half lengthwise. Ciabatta also works nicely for this sandwich. You don't want to use a narrow loaf here, like a baguette, choose something that is at least 4 to 5 inches wide.

Wash and slice the tomatoes into 1/4 inch thick slices. Slice the mozzarella as well.

Pick some fresh basil leaves off of their stems, rinse and dry them. Get out your best extra virgin olive oil.

Generously drizzle the olive oil over both halves of the bread. Layer the mozzarella slightly overlapping and completely covering one half of the loaf.

Layer the tomatoes over the mozzarella, and sprinkle generously with salt and fresh ground black pepper. Top the tomatoes with a layer of basil leaves.

Top the sandwich with the other half of the bread, slice carefully into pieces, and enjoy!

______________________________

Caprese Sandwich
15 minutes - Serves 2 to 4 as a meal depending on appetite
  • One large loaf of crusty bread (not baguette, something wider)
  • extra virgin olive oil
  • about 4 medium size balls of fresh mozzarella, sliced into 1/8 to 1/4 inch slices
  • 2 large, ripe tomatoes (whichever variety you prefer), rinsed and sliced into 1/4 inch slices
  • 10 to 20 leaves of fresh basil, stemmed, rinsed and dried
  • kosher salt (1/4 to 1/2 teaspoon)
  • fresh ground black pepper (about 1/4 teaspoon)
  1. Slice the bread in half lengthwise
  2. Generously drizzle olive oil over both halves of the bread
  3. Layer one side of the bread with the mozzarella slices, slightly overlapping and completely covering the bread
  4. Layer the tomatoes over the mozzarella
  5. Sprinkle salt and pepper over the tomatoes, add more or less to taste
  6. Top the tomatoes with a layer of basil
  7. Place the other half of the bread on top, press down slightly and carefully slice the sandwich into as few as 2 or as many as 8 slices (and smaller and it's hard to slice/eat without the sandwich falling apart)