Monday, August 9, 2010

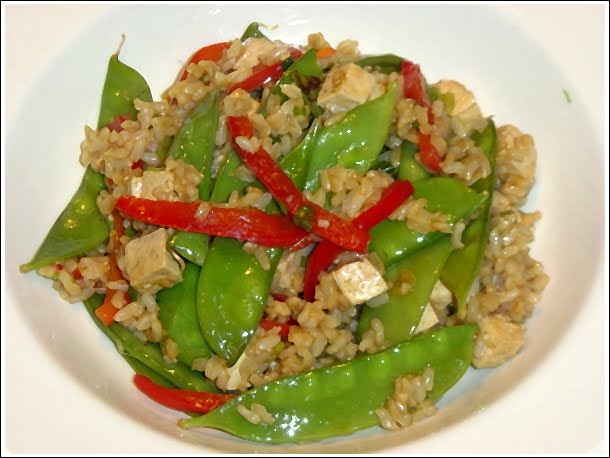
Veggie Fried Rice With Tofu

This excellent vegetable fried rice recipe comes from one of the many Moosewood cookbooks, I'm not sure which one though, because it is not one of the ones that I own. The recipe was passed to me from my friend John, who as I may have mentioned before, is no slouch in the kitchen, and is considered (by me) to be one of the most reliable recommenders of recipes (or practically anything else) around these here parts. Red peppers and snow peas provide crunch and color, while a sweet/salty/sour/spicy tofu marinade packs a flavorful punch. Relatively light on the prep, this recipe comes together extremely quickly once the cooking starts, and is substantial enough to stand on its own as a meal.

This recipe calls for 4 cups of cooked brown rice. When making fried rice, it is customary to use day-old or leftover rice, which has had time to shed excess moisture. If you try to make fried rice with fresh rice, you will almost certainly end up with too much moisture in the pan and a mushy result. With a little foresight, this should never be a problem. Cooked brown rice freezes exceptionally well, so next time you make a batch, double it and freeze the leftover in a 4 cup portion. You'll be good to go when the urge for fried rice hits you. Just don't forget to defrost it first. If you don't have any frozen rice, just make a batch the day before you plan on cooking. Check out some other great fried rice tips, and another great recipe, at Simply Recipes.
______________________________

First, make the tofu marinade by blending minced ginger root, minced garlic, soy sauce, rice vinegar, brown sugar, dark sesame oil, and chili paste/chili oil/chili sauce in a small bowl. Chop the tofu into 1/2 inch cubes and add it to the marinade, stirring gently. Prep the rest of the vegetables before you start cooking.


Heat a few tablespoons of oil in a large skillet, then add the peppers and cook for a few minutes before adding the snow peas along with some water. This is allowed to cook for a few minutes until the water evaporates and the vegetables are tender, but still retain some crispness.


Remove the tofu from the marinade and add it to the skillet, stirring to combine with the vegetables. Add the rice and heat thoroughly. Last, stir in the leftover marinade along with the scallions and you're all done.

______________________________

Veggie Fried Rice With Tofu (adapted from a Moosewood cookbook)
Serves 4 as a small main or 6 as a side - about 30-40 minutes

Marinade
  • 1 Tbsp minced ginger root
  • 4 garlic cloves, minced
  • 1/4 cup soy sauce
  • 2 Tbsp rice vinegar
  • 2 tsp brown sugar
  • 2 Tbsp dark sesame oil
  • 1 tsp chili sauce OR 1/2 tsp chili paste OR a splash of chili oil
  • 1 lb of extra-firm tofu
  • 3 Tbsp peanut or vegetable oil
  • 2 medium red peppers, cut into thin strips
  • 6 ounces snow peas, stemmed
  • 1/4 cup water
  • 4 cups cooked brown rice
  • 2/3 cup chopped scallions
  • chopped toasted almonds or pecans (optional)
  1. In a small bowl, combine marinade ingredients and mix well
  2. Cut tofu into 1/2 inch cubes and add to marinade, stirring gently
  3. Prepare the remaining ingredients (slice peppers, trim peas, chop scallions, measure rice)
  4. Heat oil in large skillet over medium high heat for 3 to 4 minutes, oil should be shimmering but not smoking
  5. Add the peppers and stir fry for 3 minutes
  6. Add the snow peas and water and continue to cook until water has evaporated, about 3 more minutes - the vegetables should be somewhat tender, but retain some crispness
  7. Remove the tofu from the marinade with a slotted spoon, and stir it into the skillet
  8. Add the rice and heat thoroughly, about 3 minutes
  9. Pour on the leftover marinade, add the scallions, and stir to combine
  10. Serve immediately garnished with the chopped nuts if you choose to use them

Sunday, August 1, 2010

What I've Been Doing With Myself Since January

Well, it's been a while since my last blog update, but that doesn't mean I haven't been cooking, baking, and trying new recipes in the intervening months. I thought it might be a good idea to share a bit of what I've been up to before I start making (potentially false) promises about more regular updates in the future.

During the winter I had an amazing meal of braised short ribs with cheddared spinach on a bed of fresh made pappardelle at Caseus, an excellent fromagerie and bistro style restaurant. It inspired me to finally braise some short ribs of my own, and I settled on this recipe from Simply Recipes, which I've made two times. The resulting meat was so amazingly tender and full of flavor from the wine reduction - the beef literally falls of the bone, cuts like butter, and melts in your mouth.

As Easter approached, and I found out I would be hosting my parents and brother for dinner, I decided to try and recreate my entire dinner from Caseus, substituting lamb shanks for short ribs. Of course this meant making my own fresh pasta, something else I had never done. I followed this tutorial, rolling out the pasta sheets by hand since I didn't have a pasta machine. The dough was easy enough to make, but I just couldn't roll the dough out thin enough, and the resulting noodles cooked up thick tough rather than thin and delicate. I bought a pasta machine, and a few days later, made my first batch of delicious fresh pasta (with an assist from my lovely wife since I couldn't quite seem to crank the dough through the machine and hold it coming out the other end at the same time).


The lamb shanks came out beautifully, as did the fresh fettuccine, and I served it all over my own version of cheddared spinach (steamed baby spinach leaves tossed with microplaned sharp cheddar). I must say that while my recreation didn't quite measure up to the original, it was pretty darn close.
______________________________

I have a few more things to share...

This is the simplest and best pasta recipe I've come across in quite a while, thanks to one of my favorite blogs, Smitten Kitchen. Apparently, spaghetti with cheese and black pepper is an Italian pantry cooking staple that I'd somehow missed for my entire life. It's also one of the most beloved dishes at Mario Batali's acclaimed New York restaurant, Lupa. I've probably made this five times since I discovered the recipe, and that's only because I can't justify eating a pound of spaghetti and cheese more than once a week. I want this all the time.

Also from Smitten Kitchen comes the excellent "best cocoa brownies" recipe, which I can't endorse highly enough. Really delicious brownies on the chewy end of the brownie spectrum. I suggest trying peanuts instead of walnuts, for an interesting Snickers-esque quality.

A wonderful guacamole with bacon from Rick Bayless is delicious as a topping for quesadilla, spread on a turkey sandwich, or just eaten with chips. Smoky, spicy chipotle peppers blend nicely with the bacon and tomatoes to make a truly excellent guacamole.

And last but not least, tuna burgers with wasabi mayo. This recipe had been in my "to make" pile for a few years, and I finally decided to make them for a some friends. I would say that these burgers were probably the single best thing I've cooked since January. The comment I left on the blog where I got them pretty much says it all...

I’ve had this recipe in my “to make” pile for 3 years! Well, I finally got around to making it last night, and though I was initially hesitant about doing anything with such beautiful tuna as giving it a light sear and eating it extremely rare, I must say this recipe is amazing!


Without hyperbole, I can honestly say this is the best non-beef burger I’ve ever had, and it’s not even close. Great recipe! Thanks!

Using high quality tuna is a must, so this recipe is not a cheapie, but as an every once and a while splurge, is definitely worth the high price tag. I also baked some pita to stuff these into, and highly recommend you do the same (or at least buy some pita).


So that pretty much brings us up to speed...now, I promise to update more regularly from here on out (heh heh heh).

Tuesday, January 26, 2010

Curried Squash and Lentil Stew

I had a beautiful, three pound butternut squash sitting on my counter for about a month. It was the last item we purchased at the local farm before it closed for the winter, and for weeks I never seemed to be able to work it into a meal. I think that my subconscious mind was just in denial that the farm was closed until the spring, and that somehow, by preventing me from using the squash and having it sit on the counter instead, it was almost as if the farm never closed at all. But alas, my conscious mind won out, the farm is indeed closed, and the squash had to be used.

New Year's day provided the perfect opportunity. I was already planning on roasting a pork shoulder (great recipe here), and I had some leftovers from a baked pasta/sausage and peppers combo I had made a few days prior, but was looking for a vegetarian option to round out the menu. Perhaps a soup utilizing squash and lentils? A quick search on the internet yielded this recipe, which seemed to be just what I was looking for. After reading through the comments, I made a few modifications, namely increasing the curry powder and garlic, decreasing the amount of liquid by half, and adding in some chili powder and shredded coconut. Oh, and I left out the ginger, because I really don't like ginger. The finished product was a thick lentil stew, sweetened by the squash, with the the coconut providing a really nice reinforcing accent to the curry flavor. It was definitely a hit, and I've already made it again, although sadly, I had to get the squash at the supermarket.
______________________________

This is a very easy recipe. All the work is in the prep. Once everything is chopped, you heat the oil/butter in a large pot until the butter stops foaming, then add the onions, squash, carrots, celery, garlic, and salt then cook for about 15 minutes. Stir in the curry powder and chili powder and stir for a few minutes, then stir in the lentils and coconut.


At this point, add the stock and simmer, covered, until the lentils are cooked. The recipe suggests serving over basmati rice, but I haven't done this yet as the stew is pretty hearty on its own. I also haven't tried the cilantro oil, because I don't like cilantro. The second time I made this recipe, I found it to be at its best on the third day. If you like your stew more like soup, just add more stock (the original recipe calls for twice what I used).

______________________________


Curried Squash and Lentil Soup (adapted from Epicurious)
Serves 8 as a main course - 1 1/2 hours start to finish
  • 6 TBS vegetable oil
  • 4 TBS unsalted butter
  • 3 lb butternut squash, peeled and cut in 1/2 inch pieces
  • 2 medium onions, chopped
  • 2 carrots, chopped
  • 2 celery ribs, chopped
  • 8 cloves garlic, minced
  • 2 tsp salt
  • 3 TBS curry powder
  • 1 tsp chili powder
  • 1/2 tsp black pepper
  • 2 cups lentils
  • 1/2 cup shredded coconut
  • 1 quart water
  • 1 quart vegetable stock
  • 2 tsp fresh lemon juice
  1. Heat oil with butter in large pot over medium heat until foam subsides
  2. Add squash, onion, carrot, celery, garlic, and 2 tsp salt to pot, cook, stirring occasionally, until vegetables are softened and beginning to brown, 15 to 20 minutes
  3. Stir in the curry powder, chili powder, 1/2 tsp black pepper, and cook, stirring frequently for 2 minutes
  4. Stir in the lentils and coconut, then add the water/stock and bring to a simmer
  5. Cover pot and cook until lentils are tender, 25 to 40 minutes
  6. Stir in lemon juice and season with salt and pepper

Wednesday, January 20, 2010

Whole Wheat English Muffins

Last week, after making a pot of mushroom barley stew, I wanted to bake something to have with it. My first thought was biscuits and then I switched my thinking to corn bread, and finally settled on some whole wheat muffins. I had made some savory whole wheat muffins to have with some dinner at some point in the past, but I couldn't remember what recipe I used. The internet turned up quite a few options, but it was this recipe for whole wheat English Muffins that caught my eye. Having wanted to give English Muffins a go for quite a while, I figured there was no time like the present (which I guess is now the past), and set to work.

About 3 hours later, I was pulling my first muffins off of the griddle and was quite happy with the results. The muffins looked good, tasted even better, and after a quick fork-splitting, had all the requisite nooks and crannies. If you've got a few hours on your hands, give this one a go.
______________________________

I did make a few minor alterations to the recipe as written. First and foremost, I substituted instant yeast for the dry yeast called for. Because of the way it's produced, instant yeast can be mixed directly into flour without proofing first in water. I find this to be quite convenient, and I'm sure you will too. If you're going to do any significant amount of bread baking, I highly recommend picking up a pound of SAF Instant Yeast (which can be stored in your freezer, and will last for months). I just made sure to add an extra 1/4 cup of water to the wet ingredients in the recipe (since I didn't have to proof the yeast). Second, I wanted my muffins to be 100% whole wheat, so I subbed 1 cup of white whole wheat flour for the white flour. Third, I added the wet ingredients to the dry all at the same time, mixed until the flour was moistened, and then did the kneading with my Kitchen Aid.
______________________________

Start by mixing the dry ingredients, and then the wet, in separate bowls.

As Alton Brown would say, add the wet team to the dry team. Mix everything until the flour is moistened, then knead either by hand or by mixer. I mixed on speed 2 in my Kitchen Aid for 4 minutes, allowed a 5 minute rest, then gave it 4 more minutes. If your kneading by hand, I'd probably go about 10 minutes (and try to resist the urge to add too much extra flour, the dough should be a bit sticky).

Round the dough into a ball, place in a lightly oiled bowl covered with plastic wrap until doubled in size. The tip in this recipe about using the microwave and a cup of water to create a warm, moist place for the dough to rise is an excellent one that I've used many times with great success. Give it a try.

Punch the dough down and roll it out about 1/2 inch thick. Cut into 3 inch rounds.

After all the dough is cut, cover the rounds with a damp cloth and allow them to rest for 20 minutes. Begin preheating a griddle or large nonstick skillet over medium/low heat.

The most interesting aspect of making English muffins is the fact that they are not baked, but cooked on a griddle. This gives a distinctive browned top and bottom with a tender, soft middle to the cooked muffin. The trick is to have the pan just hot enough to brown the top and the bottom in about 8 to 10 minutes (5 minutes on first side, 3-5 on second side), and cook the muffin through the middle. If the heat is too low, they won't cook properly, and if the heat is too high, the top and bottom will brown (and burn) before the middle is cooked through. As the recipe says, you may sacrifice the first few while you get used to the cooking process.


Sprinkle some corn meal on the griddle and place a few rounds on the pan. Cook for 5 minutes then flip and cook for 3 to 5 additional minutes. Remove to a rack and cool completely.

If you want the aforementioned nooks and crannies, split the muffins with a fork. Toast, top as you like and enjoy! These went great with the stew, and the few that I had leftover froze beautifully. Just split them before you freeze them, then just pop one or two in the toaster whenever you need a warm, toasty muffin.

Recipe: Whole Wheat English Muffins

Wednesday, January 13, 2010

Mushroom Barley Stew

The frigid heart of winter is a time for stew. Combining the heartiness of a meal, with the warm deliciousness of soup, there's nothing quite like a bowl of stew on a cold day. Just imagine hearty chunks of potato, earthy mushrooms, some carrots for sweetness, the chewy toothsomeness of barley, all in a rich broth with hints of sage...(this is starting to sound like a Chunky Soup commercial)...sounds good, right? This is a great recipe to make on a Sunday afternoon, then stow away in the fridge for easy weeknight meals, or even weekday lunches. As with pretty much all soups and stews, this one is definitely better the next day. Serve with some nice warm crusty bread, or fresh baked biscuits, and you'll want for nothing on those frigid winter nights.
______________________________

This recipe really couldn't be easier. Prep all the ingredients then heat the oil in large (at least 5 quart) pot over medium heat. Add onion, carrot, celery, garlic, potatoes, sage, salt and pepper.


Cook until the veggies start to brown, stir in the mushrooms and cook an additional 5 minutes. Add the barley, and cook, stirring frequently for 2 more minutes. Add the stock and/or water, bring to boil, reduce heat, cover and simmer for 30 more minutes. Salt and pepper to taste and voila! Stew!

Don't like barley? Try brown rice, quinoa, wheat berries, couscous, bulgur, or whatever grain suits your fancy. Feel free to experiment with herbs as well, substituting rosemary or thyme for the sage, or use them in combination. Not a mushroom eater? Leave em' out. Try some butternut squash or sweet potato in there. So many possibilities!
______________________________

Mushroom Barley Stew (~1 hour 15 minutes - 6 to 8 large servings)
  • 4 TBS olive oil
  • 2 cups chopped onion
  • 4 medium waxy potatoes, peeled and cut into chunks (cut lengthwise into quarters, cut each quarter into 3 pieces)
  • 4 ribs celery, chopped
  • 4 carrots, peeled, halved lengthwise, and chopped into chunks
  • 8 cloves garlic, peeled
  • 1 tsp dried sage
  • 1/2 teaspoon salt
  • 1/2 teaspoon fresh ground black pepper
  • 4 cups sliced mushrooms (any type, I like a combo of baby bella and button)
  • 2/3 cup uncooked pearled barley
  • 6 cups vegetable stock (can use water, or a water/stock combo)
  1. Heat oil in large pot over medium heat (pot should be at least 5 quarts)
  2. When oil shimmers, add onion, potato, celery, carrot, garlic, sage, salt, and pepper
  3. Stir to combine and cook, stirring occasionally, until the vegetables start to brown, about 10 minutes
  4. Stir in the mushrooms and cook for 5 more minutes
  5. Stir in the barley and cook, stirring frequently, for 2 minutes
  6. Add the stock/water, raise the heat, and bring to a boil
  7. Lower heat, cover and simmer for 30 minutes
  8. Taste then season with additional salt* and pepper to taste
*If you used water or a homemade stock that is low on salt, you might need to add as much as a teaspoon or more of salt (add 1/4 teaspoon at a time, tasting as you go). Store-bought stocks are often quite high in salt, so taste and go from there.

Sunday, April 12, 2009

Easter

Aside from Thanksgiving, Easter is probably my favorite food holiday. Roast lamb, rice pie, ham pie (pizzagain)...all things that I love, made even more special because I only have them once a year on Easter and the fact that they are all expertly made by my mother. Oh yeah, how could I forget the Cadbury Mini Eggs...I really love those too!

Here's my contribution to this years meal, two loaves of french bread and an Easter Rye.


Whether or not you celebrate Easter (you can still have the Mini Eggs at least), have a great day!

Saturday, April 11, 2009

Braised Escarole with Garlic and Oil

The other day I was faced with a head of escarole, a leftover ingredient from a pot of soup that I never made, that I had no idea what to do with. Roasted chicken sandwiches were already on the menu for dinner, so I figured I could easily turn the escarole into a side of some sort. My wife told me that her grandmother likes to saute escarole with a bit of oil and garlic (knowing her grandmother, I'm sure it is actually WAY MORE than a bit) and that it comes out bitter, but that's the way grandma likes it. I was into the oil and garlic, but not so much the bitter. After looking through a few recipes online, I decided that I would go with a quick braise, which hopefully would result in nice soft (but not mushy) greens, without me having to worry about burning garlic over a longer cooking time. Since I was having chicken, I chose chicken broth as a braising liquid. I decided to add some onions for a little sweetness to balance the bitterness of the escarole, and a little crushed red pepper for a touch of heat. It all came together quite nicely. In a moment of inspiration, I did what my dad would probably do, and ended up putting the escarole on the sandwich, which was really nice.

I liked it so much that I bought two more heads the next day and made it to accompany the turkey burgers I was having. I can imagine this would be great stirred into some pasta with a little grated cheese, or with some sausage on a roll, or maybe with some cannellini beans...
______________________________

Start by cutting, washing well, and drying the escarole. Heat the oil over medium for a few minutes, then saute the onion, garlic, and red pepper for a few minutes.


Add the escarole and braising liquid, stir to combine, cover and cook for 15 minutes. Give it a stir and it is ready to go.


Makes a great side or sandwich topping.

______________________________

Braised Escarole with Oil and Garlic
About 30 minutes - Serves 2 to 4 as a side
  • 1 large head escarole, washed, dried, and cut into 2 inch pieces
  • 3 tablespoons extra virgin olive oil
  • 3 garlic cloves, minced or pressed
  • 1/2 of a medium red onion, thinly sliced
  • 1 teaspoon crushed red pepper flakes
  • 1 cup chicken broth (or vegetable broth, dry white wine, etc.)
  • salt to taste
  1. Heat the oil in a large saucepan over medium heat for 5 minutes, until it shimmers but is not smoking
  2. Add the onions, garlic, and red pepper and saute for 3 minutes
  3. Add the escarole and chicken broth, stirring to combine ingredients
  4. Cover the pot and cook for 15 minutes
  5. Remove the cover, stir, salt to taste and serve
Use a non-meat based braising liquid for an all-veggie version of this recipe.

If you would like the escarole to be a bit drier, uncover after 10 minutes and cook for the last 5 minutes uncovered to boil off some of the remaining liquid.

Tuesday, March 24, 2009

Falafel and Pita

There were three lunch trucks outside the library where I worked in college, one of which was affectionately known as the "Greek Truck." I am pretty sure that this had to do with the fact that they had gyros and a big Greek guy, who whenever you would order anything with the works, would yell into the back of the truck to whomever was working the grill, "Give me a gyro all the way!" From this man I had my first pita with hummus, sprouts, and cucumber and I was hooked right away. Soon after I had my first falafel, and all was right with the world. Now anything on a pita always makes me think of that lunch truck and the man who taught me that it's not pronounced "jahy-ro," but "jeer-oh."

I have made a few pita recipes over the past year or so with pretty good results, but I have tried a different recipe pretty much every time. Recently, when I saw a post about pita on the Smitten Kitchen blog, I knew that I had yet another new recipe to test. Now, what to put in the pita once they were baked? Falafel sounded good to me, so I decided to try my hand at frying some up. Except for one somewhat failed attempt many years ago at one of my first all-veggie meals to try and impress my new fiance (she married me anyway so I guess those falafel couldn't have been too bad), I have never made falafel at home. I perused a few recipes and settled on this one from Mark Bittman.

The pita recipe worked beautifully. The dough was very easy to work with and the pita puffed nicely in the oven.

Now I think I'm finally ready to take the plunge, settle down, and commit to a pita recipe.

The falafel were very good as well. I cut down the cayenne in the recipe by half and forgot to add the onion, although I don't think the falafel were any worse for it. I am definitely going to be making this recipe again as well. I prefer a light, tangy yogurt sauce on my falafel rather than a tahini-based sauce. I just combined some yogurt with a bit of lemon juice, some minced garlic, and a dash of salt, pepper, and cumin. Delicious!

All I can say is, "Give me a falafel, all the way!"
______________________________

Pita Bread Recipe from Smitten Kitchen

Falafel Recipe from Mark Bittman's Bitten Blog

Saturday, March 21, 2009

Brown Rice and Black Bean Soft Tacos

A few weeks ago I inadvertently recreated one of my old favorite fast food items. I had not eaten anything from any fast food restaurant in at least 5 years, probably even longer, but nonetheless I found myself experiencing a bit of food déjà vu. I was pretty sure I had never made a burrito (actually it was more of a taco due to over-stuffing) with this exact combination of ingredients, but I knew I had eaten it before. Then it struck me, the Seven Layer Burrito from Taco Bell - rice, beans, sour cream, guacamole, cheddar cheese, lettuce, and tomato (I looked it up). Of course, my dinner was slightly different as I had mashed avocado rather than guacamole, crumbled goat cheese instead of cheddar, and salsa instead of tomato, but the essence remained the same. Fond fast food memories came flooding back, making me feel all nostalgic, as well as slightly nauseous, for times spent with good friends driving around and...well, eating at fast food restaurants.

The amazing technique for cooking the brown rice used in this recipe comes from Cook's Illustrated Magazine, and it has been a revelation for me. I know it sounds pathetic, but I have never been able to cook brown rice with any type of consistency. This technique has you bake the rice in the oven, which was completely new to me. I have made brown rice this way at least ten times now, and its always come out exactly the same, that is to say, absolutely perfect. I'll never simmer it on the stove top again. The only down side is that you need to start 1 hour and 20 minutes before you want to use the rice, so some planning ahead is definitely required. Alternatively you can make a large batch of rice in advance, and freeze it in smaller portions to defrost and reheat as needed.
______________________________

Start by preheating your oven to 375 degrees. Measure out 1 1/2 cups of brown rice into an 8-inch, oven safe baking dish. Measure out the spices and bring the water and oil to a boil.

Stir the spices into the boiling water and pour it over the rice. Pouring the water into the dish will move the rice around, so just use a spoon to coax it back into a nice even layer.

Cover tightly with a double layer of foil and place into the oven for 1 hour.

While the rice cooks, open up a can of black beans, rinse them and drain them well. When the rice is done, make sure to uncover it carefully or you can get a pretty nasty steam burn.

Fluff the rice with a fork, and place the foil loosely back over the top for 5 minutes.

While you are waiting for the rice, mash the avocado. You don't want to do this too far in advance because the avocado tends to discolor quickly. Stir the beans into the rice and allow it to sit uncovered for a few more minutes.

To assemble your soft tacos, start with a medium size (about 8 inch) flour tortilla. Spread as much sour cream as you like in the middle (I generally use about 1 tablespoon per taco).

Spoon approximately 1/8 of the rice mixture onto the sour cream and top with some goat cheese. I got the idea for goat cheese in tacos from this great recipe by Rick Bayless, the undisputed king of authentic Mexican cuisine in America. I know goat cheese sounds a little weird for tacos, but I think it adds a really nice tangy flavor and creaminess that you don't get from grated cheddar or jack cheese, but you can use whatever you like of course.

Next comes a little of your favorite salsa spooned over the top and a generous dollop of mashed avocado. If tomatoes are in season, I'm sure some fresh, diced tomato would be great, but if they're not in season, skip the tomato and use the salsa.

Top with some nice crispy romaine lettuce and you're ready to eat.

______________________________

Brown Rice and Black Bean Soft Tacos
1 hour 30 minutes (about 10 minutes if rice and beans is cooked in advance) Makes 8 to 10 tacos
  • 1 1/2 cups long grain brown rice
  • 2 1/3 cups water
  • 2 teaspoons vegetable oil
  • 1/2 teaspoon salt
  • 1 1/2 teaspoons chili powder
  • 1/2 teaspoon cumin
  • 1/2 teaspoon oregano
  • 1 15 ounce can black beans, rinsed and drained well
  • 8 to 10 flour tortillas
  • sour cream
  • 4 ripe avocados
  • crumbled goat cheese
  • your favorite salsa
  • romaine lettuce, washed, dried, and cut into bite size pieces
To make the rice and beans:
  1. Adjust oven rack to middle position and heat oven t0 375 degrees
  2. Place rice in 8-inch square, oven safe baking dish
  3. Place water and oil in small saucepan and bring to a boil
  4. Stir spices into boiling water
  5. Pour boiling water over rice, smooth rice into an even layer with a spoon
  6. Cover tightly with a double layer of foil
  7. Place into oven for 1 hour
  8. Remove from oven and carefully uncover
  9. Fluff rice with fork, then place foil loosely over top and allow rice to sit for 5 minutes
  10. Uncover, mix in beans with fork, and allow the rice to sit uncovered for 5 more minutes
To assemble the tacos:
  1. Prepare flour tortillas according to package directions
  2. Place a tortilla on a plate and spread about 1 tablespoon of sour cream evenly over the middle of the tortilla
  3. Place 1/8 to 1/10 of the rice and beans (about 1/2 cup) onto the tortilla
  4. Top the rice and beans with a few crumbles of goat cheese (about 1 to 2 tablespoons)
  5. Place a few spoons of salsa on top of the cheese (about 1 to 2 tablespoons)
  6. Top the salsa with a generous dollop of mashed avocado (about 1/3 cup or more if you like)
  7. Sprinkle a few pieces of lettuce on top
  8. Repeat as many times as you like
_______________________________

Brown rice is much healthier for you than white, but it takes considerably longer to prepare. The cooking method in this recipe makes delicious rice, is very simple, and is hands off for almost all of the cooking time leaving you free to prepare the rest of your meal. Use the brown rice cooking technique above whenever you need brown rice, simply omit the chili powder, cumin, oregano, and beans.

Sunday, March 15, 2009

Chicken Salad Contessa

Ever since I was a kid I have always loved turning leftover protein into salads, and then sandwiches. Of course, what I mean by this is chopping whatever chicken, beef, pork, lamb, hard boiled egg, etc., remains from dinner into little bits and mixing it with gobs of mayonnaise, then heaping the mixture onto whatever type of bread was available. Not exactly the most elegant preparation, but it always got the job done. It never actually occurred to me at the time that you did not have to wait for leftovers, you could prepare the meat specifically for this purpose, and that the addition of a few other ingredients could turn ho-hum, overly mayonnaised salads into some truly spectacular sandwich fillings. Hence, over the years my love of mixing meat with mayo has not diminished one bit, but has undergone quite an evolution.

My friend and coworker John has been bringing this chicken salad to work for lunch the last few weeks that intrigued me quite a bit. A slightly modified version of a recipe from the Barefoot Contessa (recipe link at the end of post), it starts with roasted, skin-on, bone-in chicken breasts and combines the meat with mayo, sour cream, some toasted nuts, grapes, and tarragon.


I wanted it immediately the first time I saw him take it out of his lunch bag and heard him describe the recipe. When my other friend and coworker Diana came in last week with some chicken salad of her own, the same recipe, I knew I had to make it as soon as possible (which turned out to be last Friday).


The thing I love about making recipes that others have made is that the recipes have already been tested and any possible trouble spots are thus easier to avoid. This recipe is a good example, as it calls for 2 teaspoons of salt (yes, 2 whole teaspoons) to be added to the dressing, hardly any of which is necessary. I knew this going in, and cut down the salt dramatically. I also knew that the dressing amount could be cut as well, and I used seedless red grapes instead of green. All information gleaned from discussions with my friends. If you don't have your own personal recipe testers, a great thing to do is find a recipe website, like Food Network or Recipezaar, that has user comments along with the recipes. You can pick up many great tips from countless others who have tried the recipe before you.

For this particular recipe I doubled the chicken, halved the mayo and sour cream, reduced the salt to 1/4 teaspoon (and I'm not sure it even needed that), and reduced the nuts by half. Although the recipe was intended to produce a salad eaten on a bed of lettuce, I could never eat chicken salad this way knowing I'm just 2 slices of bread away from sandwich heaven. I found this particular recipe to be quite good, the grapes added a nice refreshing burst of sweet flavor that I found to be a nice accent. And tarragon is fast becoming one of my favorite herbs, as I find it pairs extremely well with poultry. The real keeper though from this recipe is the easy and delicious chicken preparation. The meat came out cooked perfectly, and starting with bone-in, skin-on chicken breasts really kicks up the flavor while reducing the price tag (don't be a boneless/skinless chicken snob). I'll definitely be using this particular prep whenever I make chicken salad from now on.
______________________________

Oh yeah, the recipe(s)...

The recipe described above - Chicken Salad Contessa

My favorite chicken salad - Cranberry-Walnut Chicken Salad

My favorite egg salad - Egg Salad Sandwich

Thursday, March 5, 2009

Spaghetti with Tuna, Arugula, and Hot Pepper

Here's a quick pasta dish that can be made with (mostly) pantry ingredients from another great blog, Simply Recipes. Saute some minced garlic and red pepper flakes in olive oil, add in some tuna and mix with the spaghetti and arugula, a little salt and pepper and you're done. Once the water boils, this one comes together in about 10 minutes with very little prep.

I'm not always crazy about arugula because I find its bitterness a bit off putting in certain dishes. I was going to swap in baby spinach, but they did not have any at the grocery store when I went shopping, so I ended up using baby arugula. All was well in the end, as I found the slight bitterness added a nice note to the finished dish. When you buy your tuna in oil, make sure it's packed specifically in olive oil (which is what the recipe calls for), not canola or some other oil. I made this mistake and ended up having to make a stop on my way home for the correct product.

Recipe: Spaghetti with Tuna, Arugula, and Hot Pepper

Monday, February 23, 2009

Escarole and Orzo Soup with Turkey Meatballs

So as I am sure you are all aware, bacterial resistance to antibiotics is starting to become a major issue all over the world. This means that some of our old standby drugs, which are some of the main reasons for our increase in life expectancy over the last 100 years, no longer cure diseases that they used to cure. Medical researchers are constantly having to devise newer, stronger treatments, and then the bacteria continue to evolve resistance. You can imagine the frustration of doctors as they try their reliable fallback treatments to no avail....I'd imagine it's not entirely unlike trying to satisfy the ever developing palate of the 2 year old child. Thankfully for the doctors (and for me), there are some things to fall back on that still work (for now).

I'm sure this is not unusual at all, but as soon as my daughter rejects whatever new menu item I have cooked up that night, we start going through the list...cheese sandwich, Cheerios and milk, peanut butter and jelly, mac and cheese, and we can usually find something that she'll eat. But lo and behold, some of these items just don't cut it anymore, and any or all of them may be rejected. Panic starts to set in as my wife and I realize we're entering a whole new world where past practice does not necessarily indicate future success. Luckily there's one item that so far has always been a hit, always does the trick, and is devoured within minutes, and that's meatball soup (more specifically Escarole and Orzo Soup with Turkey Meatballs). My daughter even eats the escarole AND asks for seconds.
______________________________

The recipe for this soup is originally from Bon Appetit but I found it featured on one of my favorite food blogs, Smitten Kitchen.

Start by beating an egg with a bit of water and soaking the bread crumbs in the egg mixture.

Mix the egg/crumb mixture with the parsley, parmesan cheese, salt, garlic, and ground turkey. Mix until just combined.

Using wet hands (so the mixture does not stick), form the meatballs. They should be about 1 inch in diameter (or smaller). A small scoop works well here for portioning. If making them 1 inch in size, you should be able to get about 40 meatballs*. Once they are all made, cover them and refrigerate for 30 minutes.

Bring the chicken stock to a boil in a large pot (at least 4.5 quarts).

Add orzo and chopped carrot, reduce heat and simmer vigorously for 8 minutes. In the meantime, wash, dry, and chop some escarole.

Add the meatballs (turn up the heat a bit as the cold meatballs will bring the temperature way down) and simmer for 10 minutes.

If you have to walk away from the pot, make sure you have somebody to watch it for you.

Add the escarole and simmer for 5 more minutes. Taste the soup and season with salt and pepper to taste.

Don't worry, your kids will eat it (until they won't).

______________________________

I've made different minor changes and adjustments each time I've made this recipe, and have a few suggestions:
  1. *I use 1 pound of ground turkey instead of 12 ounces (and I don't use turkey breast meat, but the ground turkey that is a combo of light and dark meat). The seasoning to me is perfect when you make this change, and you get more meatballs!
  2. The taste of this soup is excellent as the Parmesan cheese in the meatballs really infuses the soup with flavor, especially if you make it a day in advance. One (potential) downside to making it in advance is that the orzo sops up quite a bit of the broth, and the once brothy soup becomes more stew-like. Now this is not a problem for my family and I because we like the soup this way. If you want your soup flavorful buy still brothy, either thin it out with a little warm stock or water then next day, or don't add the orzo when you make the soup, instead just boil it when you are reheating the soup and add the cooked orzo before serving.
  3. I've used dried parsley instead of fresh, and the soup has been just as good.
  4. I've made this soup with both homemade and store bought chicken stock, and it's pretty good both ways, most people probably wouldn't even know the difference.