Showing posts with label Weeknight Meals. Show all posts

Monday, August 9, 2010

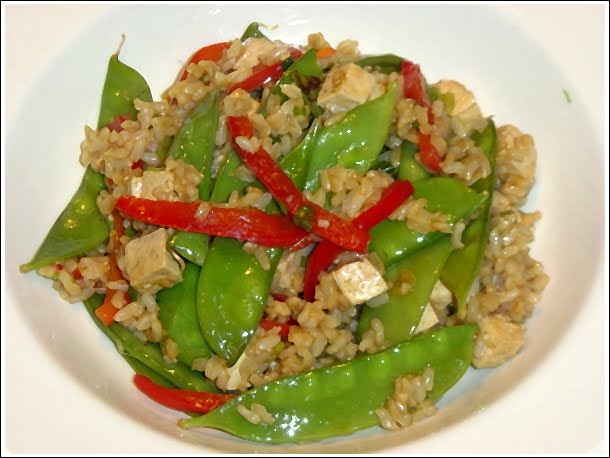
Veggie Fried Rice With Tofu

This excellent vegetable fried rice recipe comes from one of the many Moosewood cookbooks, I'm not sure which one though, because it is not one of the ones that I own. The recipe was passed to me from my friend John, who as I may have mentioned before, is no slouch in the kitchen, and is considered (by me) to be one of the most reliable recommenders of recipes (or practically anything else) around these here parts. Red peppers and snow peas provide crunch and color, while a sweet/salty/sour/spicy tofu marinade packs a flavorful punch. Relatively light on the prep, this recipe comes together extremely quickly once the cooking starts, and is substantial enough to stand on its own as a meal.

This recipe calls for 4 cups of cooked brown rice. When making fried rice, it is customary to use day-old or leftover rice, which has had time to shed excess moisture. If you try to make fried rice with fresh rice, you will almost certainly end up with too much moisture in the pan and a mushy result. With a little foresight, this should never be a problem. Cooked brown rice freezes exceptionally well, so next time you make a batch, double it and freeze the leftover in a 4 cup portion. You'll be good to go when the urge for fried rice hits you. Just don't forget to defrost it first. If you don't have any frozen rice, just make a batch the day before you plan on cooking. Check out some other great fried rice tips, and another great recipe, at Simply Recipes.
______________________________

First, make the tofu marinade by blending minced ginger root, minced garlic, soy sauce, rice vinegar, brown sugar, dark sesame oil, and chili paste/chili oil/chili sauce in a small bowl. Chop the tofu into 1/2 inch cubes and add it to the marinade, stirring gently. Prep the rest of the vegetables before you start cooking.


Heat a few tablespoons of oil in a large skillet, then add the peppers and cook for a few minutes before adding the snow peas along with some water. This is allowed to cook for a few minutes until the water evaporates and the vegetables are tender, but still retain some crispness.


Remove the tofu from the marinade and add it to the skillet, stirring to combine with the vegetables. Add the rice and heat thoroughly. Last, stir in the leftover marinade along with the scallions and you're all done.

______________________________

Veggie Fried Rice With Tofu (adapted from a Moosewood cookbook)
Serves 4 as a small main or 6 as a side - about 30-40 minutes

Marinade
  • 1 Tbsp minced ginger root
  • 4 garlic cloves, minced
  • 1/4 cup soy sauce
  • 2 Tbsp rice vinegar
  • 2 tsp brown sugar
  • 2 Tbsp dark sesame oil
  • 1 tsp chili sauce OR 1/2 tsp chili paste OR a splash of chili oil
  • 1 lb of extra-firm tofu
  • 3 Tbsp peanut or vegetable oil
  • 2 medium red peppers, cut into thin strips
  • 6 ounces snow peas, stemmed
  • 1/4 cup water
  • 4 cups cooked brown rice
  • 2/3 cup chopped scallions
  • chopped toasted almonds or pecans (optional)
  1. In a small bowl, combine marinade ingredients and mix well
  2. Cut tofu into 1/2 inch cubes and add to marinade, stirring gently
  3. Prepare the remaining ingredients (slice peppers, trim peas, chop scallions, measure rice)
  4. Heat oil in large skillet over medium high heat for 3 to 4 minutes, oil should be shimmering but not smoking
  5. Add the peppers and stir fry for 3 minutes
  6. Add the snow peas and water and continue to cook until water has evaporated, about 3 more minutes - the vegetables should be somewhat tender, but retain some crispness
  7. Remove the tofu from the marinade with a slotted spoon, and stir it into the skillet
  8. Add the rice and heat thoroughly, about 3 minutes
  9. Pour on the leftover marinade, add the scallions, and stir to combine
  10. Serve immediately garnished with the chopped nuts if you choose to use them

Sunday, August 1, 2010

What I've Been Doing With Myself Since January

Well, it's been a while since my last blog update, but that doesn't mean I haven't been cooking, baking, and trying new recipes in the intervening months. I thought it might be a good idea to share a bit of what I've been up to before I start making (potentially false) promises about more regular updates in the future.

During the winter I had an amazing meal of braised short ribs with cheddared spinach on a bed of fresh made pappardelle at Caseus, an excellent fromagerie and bistro style restaurant. It inspired me to finally braise some short ribs of my own, and I settled on this recipe from Simply Recipes, which I've made two times. The resulting meat was so amazingly tender and full of flavor from the wine reduction - the beef literally falls of the bone, cuts like butter, and melts in your mouth.

As Easter approached, and I found out I would be hosting my parents and brother for dinner, I decided to try and recreate my entire dinner from Caseus, substituting lamb shanks for short ribs. Of course this meant making my own fresh pasta, something else I had never done. I followed this tutorial, rolling out the pasta sheets by hand since I didn't have a pasta machine. The dough was easy enough to make, but I just couldn't roll the dough out thin enough, and the resulting noodles cooked up thick tough rather than thin and delicate. I bought a pasta machine, and a few days later, made my first batch of delicious fresh pasta (with an assist from my lovely wife since I couldn't quite seem to crank the dough through the machine and hold it coming out the other end at the same time).


The lamb shanks came out beautifully, as did the fresh fettuccine, and I served it all over my own version of cheddared spinach (steamed baby spinach leaves tossed with microplaned sharp cheddar). I must say that while my recreation didn't quite measure up to the original, it was pretty darn close.
______________________________

I have a few more things to share...

This is the simplest and best pasta recipe I've come across in quite a while, thanks to one of my favorite blogs, Smitten Kitchen. Apparently, spaghetti with cheese and black pepper is an Italian pantry cooking staple that I'd somehow missed for my entire life. It's also one of the most beloved dishes at Mario Batali's acclaimed New York restaurant, Lupa. I've probably made this five times since I discovered the recipe, and that's only because I can't justify eating a pound of spaghetti and cheese more than once a week. I want this all the time.

Also from Smitten Kitchen comes the excellent "best cocoa brownies" recipe, which I can't endorse highly enough. Really delicious brownies on the chewy end of the brownie spectrum. I suggest trying peanuts instead of walnuts, for an interesting Snickers-esque quality.

A wonderful guacamole with bacon from Rick Bayless is delicious as a topping for quesadilla, spread on a turkey sandwich, or just eaten with chips. Smoky, spicy chipotle peppers blend nicely with the bacon and tomatoes to make a truly excellent guacamole.

And last but not least, tuna burgers with wasabi mayo. This recipe had been in my "to make" pile for a few years, and I finally decided to make them for a some friends. I would say that these burgers were probably the single best thing I've cooked since January. The comment I left on the blog where I got them pretty much says it all...

I’ve had this recipe in my “to make” pile for 3 years! Well, I finally got around to making it last night, and though I was initially hesitant about doing anything with such beautiful tuna as giving it a light sear and eating it extremely rare, I must say this recipe is amazing!


Without hyperbole, I can honestly say this is the best non-beef burger I’ve ever had, and it’s not even close. Great recipe! Thanks!

Using high quality tuna is a must, so this recipe is not a cheapie, but as an every once and a while splurge, is definitely worth the high price tag. I also baked some pita to stuff these into, and highly recommend you do the same (or at least buy some pita).


So that pretty much brings us up to speed...now, I promise to update more regularly from here on out (heh heh heh).

Thursday, March 5, 2009

Spaghetti with Tuna, Arugula, and Hot Pepper

Here's a quick pasta dish that can be made with (mostly) pantry ingredients from another great blog, Simply Recipes. Saute some minced garlic and red pepper flakes in olive oil, add in some tuna and mix with the spaghetti and arugula, a little salt and pepper and you're done. Once the water boils, this one comes together in about 10 minutes with very little prep.

I'm not always crazy about arugula because I find its bitterness a bit off putting in certain dishes. I was going to swap in baby spinach, but they did not have any at the grocery store when I went shopping, so I ended up using baby arugula. All was well in the end, as I found the slight bitterness added a nice note to the finished dish. When you buy your tuna in oil, make sure it's packed specifically in olive oil (which is what the recipe calls for), not canola or some other oil. I made this mistake and ended up having to make a stop on my way home for the correct product.

Recipe: Spaghetti with Tuna, Arugula, and Hot Pepper

Sunday, February 15, 2009

Spaghetti alla Boscaiola

I try a lot of different recipes that I find on the various food blogs that I read. Usually they are very good, but I just don't have time to write long blog posts detailing all of them. In the spirit of efficiency and being concise, I figured I could just past them along here on my blog.

Here's a nice quick pasta dish that I made this past Thursday night. It only involves a few ingredients, and although it's somewhat irritating to have to use 3 separate pots/pans, it's worth it in the end. If you like mushrooms, give this one a try.

Sunday, October 19, 2008

Portobello "Steak" and Cheese Sandwiches

A few weeks ago a friend of mine was coming over for dinner. When I asked him what he would like, he thought that some type of sandwich would be good. I am up for sandwiches anytime, so I immediately liked the idea. Possibilities began flying through my mind and I began to crave steak and cheese with sauteed peppers and onions (commonly called a "cheesesteak"). The only problem here is that my wife doesn't eat beef, so I would either have to make some chicken as well or convince her to settle for a pepper and onion sandwich. I also remembered that this particular friend is trying to cut down his red meat consumption, so he might not want steak and cheese. As I mentioned these things to him, he reminded me about a portobello mushroom sandwich I had made one time in the past, which was basically a grilled portobello cap with some balsamic vinegar and mozzarella cheese on a nice roll, and the wheels started to turn in my mind. I figured I could replace the steak with thick slices of sauteed portobello mushroom, keep everything else the same, and make everybody happy (except possibly myself). The sandwich would be healthier for certain, and eventhough I was a little skeptical that it would satisfy my craving, I enthusiastically went forward.

I had recently made an Italian bread recipe that was absolutely incredible, and I figured it would make equally incredible sub rolls. Luckily I had the day off from school in observance of Yom Kippur, which gave me some extra time for a little baking (okay, a lot of baking, some sourdough loaves, multigrain bread, and a quadruple batch of brownies in addition to my sub rolls, which are across the bottom of the rack in the picture).

So basically all I did was slice up a few peppers and onions, then saute them in a little oil over pretty high heat until the onions were soft and browned a little bit. Then I sauteed the sliced portobellos until they were tender. I put the veggies in a baking dish and covered it with foil until I was ready to make the sandwiches. In the meantime, I made some oven fries. When I was ready to make the sandwiches, I just heated a nonstick pan, put down some mushrooms, covered them with a generous portion of peppers and onions, and topped that with some provolone cheese. When the cheese melted, I slid the pile of veggies onto a roll, spread a little mayo on the top, and that was it.

The result? An incredibly good veggie version of a steak and cheese sandwich. I was extremely satisfied. The melted cheese mixes with the mayo and juices from the vegetables which begin to soak into the bread creating one of those whole is greater than the sum of the parts experiences. I honestly did not miss the steak at all. I will definitely be making these sandwiches again.
______________________________

Portobello "Steak" and Cheese Sandwiches
About 30 minutes - Serves 4

It's my belief that your sandwich is only as good as the bread you put it on, so don't skimp on the rolls. If you're not into baking your own, make sure you get some rolls from a bakery or a good deli that makes their own.

Saute the mushrooms, peppers, and onions in advance and you can then put these sandwiches together in about 5 minutes whenever you're ready to eat.

I love mayo and provolone, but if you don't like one or either of these, of course feel free to substitute cheeses and condiments as you like.
  • 24 ounces of portobello musroom caps (about 10 caps), sliced 1/4 inch thick
  • 2 onions, sliced thin
  • 2 green peppers, cored, seeded and sliced into thin strips
  • 8 slices of provolone cheese
  • Mayonaise
  • Olive oil
  • Salt and pepper to taste
  • 4 sub rolls
  1. Heat 1 tablespoon of olive oil in a large non-stick skillet over medium-high heat until the oil starts to shimmer
  2. Saute the onions and peppers, tossing occasionally, until they have softened considerably and the onions start to brown, approximately 6 to 10 minutes, remove them from the pan to a dish and cover
  3. Add 1 tablespoon of oil to the pan, add the mushrooms and sprinkle with salt and pepper, then saute the mushroom slices, tossing occasionally until they become tender, about 5 minutes, remove them from the pan to the dish with the onions and peppers and cover until you are ready to make the sandwiches
  4. When you're ready to make the sandwiches, slice your rolls and spread mayonaise on both sides (as little or as much as you like) and heat a non-stick skillet over medium heat
  5. Place 1/4 of the portobellas in the pan, top with 1/4 of the peppers and onions, salt and pepper to taste, and top all the veggies with 2 slices of provolone cheese
  6. When the cheese melts, use a large spatula to transfer everything to a roll
  7. Repeat with the rest of the ingredients to make 3 more sandwiches

Thursday, October 9, 2008

Chick Pea and Artichoke Heart Stew

Since school started my weekday cooking time has been severely cut down. To compensate, I've been making a double recipe of a different soup or stew every weekend since the beginning of September. The soup gets better and better as the week goes on, and I don't have to worry about cooking dinner when I get home from cross country practice. A nice bowl of soup with a few slices of bread makes a perfect weeknight meal with very little clean up, which is key when the kids need baths, stories, etc...

Chick Pea and Artichoke Heart Stew is one of my (and my wife's) favorites. This is another one of those recipes that was passed my way by my friend John, who got it from the Moosewood Restaurant Cooks at Home cookbook. Brimming with chick peas, chunks of potato, and artichoke hearts, this is definitely hearty enough to make a meal. Turmeric gives it a wonderful golden color, and combined with sweet paprika, a deep, earthy taste. A sprig of fresh rosemary and some fresh sage round out the aroma of this stew quite nicely. It's actually quick enough to make on a weeknight, as it only takes about 30 minutes from start to finish, but as with most soups and stews, if you take the time to make it ahead, the flavors have time to meld so the soup tastes even better when reheated. I suggest doubling the recipe so you have plenty of leftovers.

The recipe calls for water or stock, but I prefer the extra flavor you get when you start with stock. I'll still use store bought stock in a pinch, but when I have the time, I like to make my own. There are many advantages to doing this. Here's three: First, it's cheaper than buying ready made, second, you can control the amount of salt (since most prepared stock is absolutely loaded with sodium, even the low sodium varieties), and third, it tastes significantly better. What else do you want? I've included a recipe for a quick vegetable stock that is a slightly modified version of a stock recipe from Super Natural Cooking by Heidi Swanson, creator of the excellent food blog 101 Cookbooks.
______________________________

Vegetable stock can be complex or relatively simple. Basically all you need is some aromatic vegetables, some fresh herbs, and some water. This stock is at the very simple end of the spectrum. The only required ingredients are onion, garlic, celery, thyme, water, and salt. In this version I've added some fresh parsley and carrot, but they are by no means required. Start by chopping the vegetables into large chunks and heating a small amount of olive oil in a large pot.

Dump all the vegetables in the pot and stir them around. Let them sit for a minute or two and stir them again, keep doing this until the vegetables look like they are starting to soften.

Once the vegetables are starting to soften, let them sit in the pan without stirring them for about 5 minutes or so. The goal here is to develop some brown bits (kind of faux vegetable fond) on the bottom of the pan that you can scrape up when you add the water. These caramelized bits will give the stock a deeper flavor in addition to a darker color. Once you have some nice brown bits, add the water and salt.

Bring to a boil, then lower the heat, cover, and simmer for one hour.

Strain the stock, pressing down on the vegetables to extract as much fluid as possible. Since this is a meatless stock the only fat is from the olive oil, so you don't have to do any skimming or other type of fat removal. The stock can be used immediately, stored in the fridge for up to a week, or frozen.

______________________________

The making of this stew goes quick, so prepping all the ingredients in advance is a good idea. One of the ingredients is pureed squash, and the recipe suggests using a jar of squash baby food which is what I have done every time I have made this recipe. It seems easier to me than cooking and pureeing just 1/2 cup of squash or sweet potato. When you're ready to start, heat the olive oil in a large pot over medium heat until it shimmers, add the onion and garlic and saute until soft.

While the onions and garlic are cooking, bring the water or stock to a simmer. Add the turmeric and paprika to the softened onions.

Add the potatoes, rosemary, sage and then the simmering water or stock.

Bring the stew to a simmer and cook until the potatoes are soft, about 12 minutes or so. At this point you remove the rosemary sprig, add all the rest of the ingredients (pureed squash, chick peas, artichoke hearts), taste, and season with salt and pepper. Return the soup to a simmer and allow the flavors to mingle for a few minutes and you're done.

______________________________

Vegetable Stock (adapted from Super Natural Cooking)
About 1 hour and 30 minutes - makes approximately 8 cups
  • 1 tablespoon olive oil
  • 3 large onions, cut into eighths
  • 1 clove garlic, peeled and smashed
  • 2 ribs of celery, chopped into large pieces
  • 5 sprigs of fresh thyme
  • 8 cups of water
  • 2 teaspoons of table salt (can be reduced or increased to taste)
  • 2 large carrots, chopped into large pieces (optional)
  • a handful of fresh parsley (optional)
  1. Heat the oil in a large pot over medium heat until it shimmers
  2. Add all the vegetables and herbs to the pot and stir
  3. Stir every minute or so until the vegetables start to soften, about 6 minutes total
  4. Let the vegetables sit without stirring until brown bits begin to form on the bottom of the pot, about 5 minutes
  5. Add the water and salt, stir and scrape the bottom of the pot to loosen any brown bits
  6. Bring to a boil, lower the heat, cover, and simmer for one hour
  7. Strain the stock pressing down on the vegetables in order to remove as much liquid as possible
______________________________

Chick Pea and Artichoke Heart Stew (from Moosewood Restaurant Cooks at Home)
About 30 minutes - serves 4 to 6
  • 4 cups water or vegetable stock
  • 2 medium onions, chopped (about 1 1/2 cups)
  • 2 garlic cloves, minced or pressed
  • 2 tablespoons olive oil
  • 1 teaspoon turmeric
  • 1 teaspoon sweet paprika
  • 4 medium waxy skinned potatoes, peeled and cut into 1/2 inch cubes
  • 1 sprig fresh rosemary
  • 5 leaves fresh sage, minced
  • 4.5 ounce jar pureed squash baby food or 1/2 cup pureed winter squash or sweet potato
  • 3 cups drained cooked chick peas (two 15 ounce cans)
  • 1 1/2 cups drained quartered artichoke hearts (one 14 ounce can)
  • Salt and ground black pepper to taste
  • lemon wedges (optional)
  • grated Pecorino Romano or Parmesan cheese (optional)
  1. Bring the water or vegetable stock to a simmer
  2. Saute the onions and garlic in the oil until soft, about 6 to 8 minutes
  3. Stir in the turmeric and paprika, saute for 1 minute
  4. Add the potatoes, rosemary, sage, and water/stock
  5. Bring to a simmer and cook until potatoes are tender, about 12 minutes
  6. Stir in the pureed squash, add the chick peas and artichoke hearts, remove the rosemary
  7. Season with salt and pepper to taste
  8. Return the stew to a simmer for a few minutes to allow the flavors to meld
  9. Serve with lemon wedges and top with grated cheese if you wish

Wednesday, June 25, 2008

Spaghetti with Chickpeas and Parmigiano-Reggiano

Currently, there are two major issues that are affecting my cooking. The first is time, or more specifically, the lack there of, and the second issue is the rising cost of food. Let me tackle these one at a time.

My wife and I had our first child (a lovely daughter) in Fall 2006. By Spring 2007 we had adjusted nicely to having a little person in our midst. I was planning meals and shopping and prepping on the weekend and with little to no real change on my part (other than moving dinnertime up an hour to 5:00). I estimated that I had about 1 hour less to cook and blog on a daily basis, so naturally, I felt that when we had a second child, I could expect a similar reduction in time. Naively, I expected the relationship between children and time to cook to be a linear one.

My wife and I had our second child (a handsome son) two weeks ago, and I've already reassessed my graph (I'm a science teacher, so naturally I love graphs). Unfortunately for my cooking and blogging, the relationship seems to be more of the exponential variety.

So instead of 2 less hours per day to cook and blog, It now seems it will be more like 4 hours less. Don't get me wrong, it's not like I need 4 hours to cook dinner on a daily basis, but I enjoy a leisurely pace when I cook. What does this all mean? Well, since I won't have quite as much time to spend preparing meals, I need to get faster, or find some quicker recipes for those especially tricky nights, or a little bit of both.

That brings me to food prices, which are increasing all over the world. Some basic population ecology applies here. In regards to populations, food is what we call a density dependent resource. Since food production is relatively constant at this point in human history and most arable land is in use, competition for food increases as population increases. In other words, the more members of the population, the harder it is to feed everybody. Well, take a look at what has happened to the world human population over the last 58 years (and projected over the next 42). More people means more food, and with most of our productive land maxed out, and things like the unpredictability of climate affecting farm yields, our world food supply is perilously thin.

Food prices would naturally increase as the population growth out paces production anyway, but it looks even worse due to the relatively recent phenomenon of cheap food. The Green Revolution allowed humans to produce more food than ever before, which drove down prices, enabling rapid population growth. Unfortunately, many of the advances of the Green Revolution (such as heavy use of pesticides and petroleum-based fertilizers) are unsustainable. What does it all mean? Basically, the methods by which we cheaply produce mass quantities of food are totally unsustainable and as we revert/convert to other methods of production, there will be inevitable price increases. Yet the world has gotten used to cheap food over the last 60 years, and now access to cheap food is viewed as a natural born right by most, especially Americans (along with cheap energy, cheap water, cheap products, etc.). Well, it appears that the long era of cheap food is over. A major shift in thought along with a deep examination of needs versus wants seems to be in the cards for the human species.

So I have been trying to stock my pantry and come up with some new, quicker meals that might save me a little money as well. An excellent choice to address both of these issues is beans. Beans are a relatively cheap source of protein (especially if you buy them dried, and the soaking is all hands off time) that can be combined with whole grains to provide extremely healthy, fast meals that feature complete proteins. We really like chick peas at my house, so this recipe for linguine with chickpeas and parmesan, with just 5 ingredients and 5 minutes of prep time is a real winner.
______________________________

Put a pot of water on to boil. When the water is boiling, add some salt and heat a few tablespoons of olive oil in a large skillet. Toss the spaghetti in the boiling water and cook until al dente. When the oil is shimmering, add the chickpeas and the crushed red pepper, and toss frequently.

Before you drain the spaghetti, reserve 1/3 cup of the pasta water and add it to the chickpeas. Simmer until the water is just about all evaporated then add the drained pasta and toss to combine everything.

Stir in the Parmigiano and remove the pan from the heat. I like to use Parmigiano-Reggiano (the undisputed king of cheese according to Mario Batali), but it is pretty expensive, so a domestic parmesan cheese is an acceptable alternative in the spirit of thrift (and reducing food miles). Add some black pepper, a little salt, and a little more olive oil. Toss everything together and serve.

Increase the amount of crushed red pepper for a little more kick, or maybe add a minced garlic clove or two with the chick peas for a slightly different take. This dish comes together extremely quickly, and is composed entirely of pantry items, so stock up when the sales are good, and cut back on the weekly grocery bill.
______________________________

Spaghetti with Chick Peas and Parmigiano-Reggiano (adapted from cookthink.com)
5 minutes prep - 30 minutes total - Makes 2 large portions
  • 1/2 pound whole wheat spaghetti
  • 3 tablespoons olive oil plus more for drizzling
  • 1 15 ounce can of chickpeas, drained and rinsed
  • 1/4 teaspoon crushed red pepper flakes
  • 1/2 cup freshly grated Parmigiano-Reggiano
  • salt and fresh ground black pepper
  • extra cheese for grating at the table (Parm, Romano, Grana Padano, etc)
  1. Fill a large pot with water, bring to a boil, add 2 teaspoons of salt
  2. Heat the oil in a large skilled over medium-high heat
  3. Add the spaghetti to the water and cook until al dente
  4. Add the chickpeas to the skillet with the red pepper and saute tossing frequently for 4 to 6 minutes
  5. Before draining the spaghetti, reserve 1/3 cup of the pasta water, add it to the skillet and simmer until it is just about evaporated
  6. Drain the spaghetti
  7. Add the spaghetti to the skillet, toss to combine everything
  8. Mix in the grated cheese and remove the pan from the heat
  9. Add about 1/4 teaspoon salt and ground black pepper plus a little more olive oil (no more than a tablespoon) to coat the spaghetti, toss to combine everything and serve with extra cheese to grate over the top
_____________________________

This dish is my second submission to Presto Pasta Nights, a site originally dreamed up by Ruth of Once Upon a Feast, who is again playing host this week. Be sure to check the site on Friday, July 4th for this week's roundup!

Friday, June 6, 2008

Pan-Glazed Chicken with Basil

Looking for quick, easy, and healthy? Look no further than the Weight Watchers 5 Ingredient 15 Minute Cookbook. Weight Watcher's emphasis on portion control means you can cook the recipe for the desired number of persons (and this recipe is easy to scale up or down depending on your need), and as long as your eating the recommended serving, there's no way you can overdo it. Even if you eat two servings, you're still in pretty good shape. I've tried a few recipes out of this book, and they are all easy (although 15 minutes is a stretch if you're a slow, take-your-time to make sure everything is perfect cook - like me) but this one is my favorite so far. It's amazing how the right combination of ingredients can provide amazing flavor, and this recipe marries balsamic vinegar, honey and basil with outstanding results. The only other things you need are some boneless, skinless, chicken parts, some salt and pepper, and a little olive oil.
_______________________________

Start with four boneless, skinless chicken breasts, about 6 ounces each (this is pretty small, so you might have to slice 2 large breast pieces in half). I'm sure boneless thighs would be excellent as well, if you don't mind the dark meat, a few extra calories, and a lot more flavor.

I've have to digress a bit here and relate a quick story. Last week when I was shopping for this recipe, I was contemplating my chicken purchase in the store. There was a package of organic boneless, skinless breasts which was a little over 1 1/2 pounds for about $8 and then right next to it there was a 5 lb organic roaster for roughly the same price. Now, the week before when I made barbecued chicken, I bought the parts already cut up to save time since I was making a whole bunch of other stuff (and I felt sufficiently guilty for doing so), but this time I bought the whole bird (much more economical and much less wasteful). I used the breasts to make the pan-glazed chicken, froze the legs and thighs for later use, made 2 quarts of stock from the carcass, and was able to pick enough meat off the boiled carcass to make 3 days worth of chicken salad for my daughter. You hear a lot these days about food prices, and everybody should be concerned about the underlying causes of these problems, but it is possible to get a lot more for your money (and to help the environment too) if you're willing to do a little extra work, and cutting up a whole chicken really isn't THAT hard. Just do it like this:


Okay, digression over (I could go on for another hundred pages about what we're doing to the environment for the sake of "convenience," but I won't - I will show you this though). So where was I? Oh yes, the chicken. In addition to your chicken, you'll need to chop some fresh basil, and mix together the balsamic vinegar and honey in a small bowl.

Heat 2 teaspoons of olive oil in a pan over medium heat. Sprinkle the chicken on one side with a little salt and pepper. When the oil is good and hot, it should be shimmering, but not smoking, add the chicken pieces placing the side you salted down in the pan. Sprinkle salt and pepper on the other side of the chicken.

Cook the chicken without moving it for a few minutes, until it begins to become nice and golden brown. Turn the chicken over and cook for a few more minutes. Add the vinegar/honey mixture and the basil, stir it around, and cook for 1 minute, turning the chicken once to coat it in the glaze.

Serve the chicken with some of the glaze drizzled over the top. This chicken goes great over rice, as the glaze mingles nicely with the rice and imparts it's deliciously sweet yet tangy flavor. Bu I'd bet you can serve this chicken with any starch/vegetable combo you can imagine, and you don't really have to worry about flavoring the sides beyond a little seasoning, because the pan glaze from the chicken will do the work for you. This time I served it with some oven-roasted potatoes and some plain steamed broccoli, and it was quite a hit. Now if you'll excuse me, I have to go cut up another chicken, because I'm making these for dinner.
_______________________________

Pan-Glazed Chicken with Basil (adapted from Weight Watchers 5 Ingredient 15 Minute Cookbook)
20 to 30 minutes - makes 4 servings for a light dinner or 2 servings if you're really hungry
  • About 1 1/2 pounds of boneless, skinless chicken breasts cut into 4 pieces about 6 ounces each
  • 1 1/2 tablespoons honey
  • 3 tablespoons balsamic vinegar
  • 3 tablespoons chopped fresh basil
  • salt and pepper
  • 2 teaspoons of olive oil
  1. Pat your chicken pieces dry (slice them in half if they are really thick) and place them on a plate
  2. Combine the honey and vinegar in a small bowl, stir well to dissolve the honey
  3. Heat the oil in a large, non-stick skillet over medium heat
  4. Sprinkle the top side of the chicken with salt and pepper
  5. When the oil is hot, place the chicken in the pan salted-side down, sprinkle the other side with salt and pepper
  6. Cook without moving for 5 minutes, or until the chicken is nice and golden brown*
  7. Turn the chicken and cook for 5 additional minutes*
  8. Add the honey/vinegar mixture to the pan along with the basil, stir to combine all ingredients
  9. Cook for 1 minute, turning the chicken to coat it in the glaze
  10. Serve the chicken immediately drizzled with extra glaze
*The cooking time in this recipe is an estimate based on boneless breast pieces about 1/2 to 3/4 inches in thickness and may need to be adjusted for slightly thinner or thicker cuts

Saturday, April 26, 2008

Sesame Noodles with Stir-fried Tofu and Vegetables

My friend John recently passed me a wonderful recipe from Cook's Country Magazine for grilled chicken with sesame noodles, which hit the dual bullseye of being both easy to make and extremely good. Cold sesame noodles make a great dinner on a warm spring or summer evening. They can be topped with different meat and veggie combinations, eaten plain as either a main course or a side, and I'm sure leftovers would make and excellent lunch (if you have any leftovers that is - I haven't). This particular recipe gets the flavor just right with a sauce that perfectly blends salty, sweet, spicy, and peanut-y tastes...sounds good right?

The second time I made this recipe, I decided to go the vegetarian route, with excellent results. Topped with stir-fried tofu, and crunchy, colorful red peppers, carrots, and snow peas, this dish is full of healthy fats and protein, and bursting with flavor - a real winner.
______________________________

Usually I'm all about mise en place, but I'm comfortable prepping ingredients as I go along with this one, as timing is not too crucial. Just rinse all your veggies before you start and put a large pot of water on to boil and you'll be fine. So go ahead and mince the garlic and ginger, then combine it in a bowl with the soy sauce, rice vinegar, hot sauce, brown sugar, and sesame oil, then whisk everything to combine. Set aside 3 tablespoons of the sauce for later use.

Cut the carrots, red pepper, and tofu, then toss them together with the snow peas and the 3 tablespoons of sauce.

Puree the rest of the sauce with the peanut butter in a blender until smooth.

Put your noodles in the boiling water and slice the scallions while the noodles boil.

Drain the noodles, rinse them with cold water, and then drain them well. Toss the noodles in a large bowl with the pureed sauce and the scallions. If you are not going to be serving for a while, place the noodles in the fridge, just remember to take them out about 15 minutes before you're ready to eat so that they are not ice cold.

Heat the oil over high heat in a wok style pan until it is shimmering. Add the tofu and vegetables and stir-fry for a few minutes, until the vegetables are just tender. Place about 1/4 of the noodles in a bowl and top them with the stir-fried tofu and vegetables.

Here's a picture of the alternative, non-veggie version with chicken. Just marinate some boneless, skinless chicken breasts (about 1 1/2 pounds) in the separate 3 tablespoons of sauce, then grill them, slice them, and serve them on top of the noodles.

______________________________

Sesame Noodles with Stir-fried Tofu and Vegetables (adapted from Cook's Country Magazine)
About 30 minutes - Serves 4
  • 3 garlic cloves, minced
  • 2 tablespoons of minced ginger
  • 1/2 cup soy sauce
  • 3 tablespoons rice vinegar
  • 2 teaspoons hot sauce (I use Frank's Red Hot)
  • 3 tablespoons brown sugar
  • 2 tablespoons toasted sesame oil
  • 1/4 cup peanut butter (I suggest a sugar-free, salt-free peanut butter)
  • 1 package of extra-firm tofu (12 to 16 ounces), cut into 1/2 inch cubes
  • 2 cups of snow peas
  • 1 large red pepper, cut into matchstick size strips
  • 2 medium carrots, peeled and cut into matchstick size strips
  • 6 scallions (green part only), sliced thin
  • 1 pound Asian noodles (I suggest buckwheat soba noodles)
  • 1 tablespoon vegetable oil
  • salt
  1. Bring a large pot of water to a boil
  2. Whisk the garlic, ginger, soy sauce, rice vinegar, hot sauce, brown sugar, and sesame oil in a small bowl, separate 3 tablespoons of sauce and set it aside
  3. Toss the 3 tablespoons of sauce with the tofu, snow peas, red pepper, and carrot
  4. Puree the rest of the sauce with the peanut butter in a blender until smooth
  5. Add 1 1/2 teaspoons of salt to the boiling water, toss in the noodles, and boil according to package instructions
  6. Slice the scallions
  7. Drain the noodles, rinse them with cold water, and then drain them again
  8. Toss the cooled and drained noodles with the pureed peanut sauce and the scallions (refrigerate if you're not going to serve right away)
  9. Heat 1 tablespoon of vegetable oil in a wok-style pan over high heat
  10. When the oil is shimmering, add the tofu and vegetables and stir-fry until just tender, about 4 minutes
  11. Separate the noodles into 4 bowls and top each with 1/4 of the stir-fried tofu and vegetables

Friday, April 18, 2008

Creamy Cheesy Scrambled Eggs

I was never satisfied with my ability to make scrambled eggs. I tried adding milk or water to the eggs, cooking them in butter or bacon fat, with and without cheese, scrambling them in the pan rather than in a bowl, but the end result was invariably disappointing. If I was making eggs, they were gonna be fried or omelets because I could do those much better. Despite my low scrambled egg self esteem, I'd still try to make a batch every once and a while and with a little inspiration from Alton Brown, finally came up with something pretty good. Alton was making scrambled eggs over a double boiler using very gentle heat and stirring quite a bit resulting in tender, creamy looking eggs. I wasn't ready to go the double boiler route, but I tried lower heat and a bit more stirring than I usually do. The result? My wife regularly asks me for "cheesy scrambles", which has supplanted the omelet as her most requested breakfast.

This technique for making scrambled eggs takes about 10 minutes total and results in eggs that are so tender and creamy that you can literally spread them on toast, which is what I usually do. Scramble the eggs and add them to a cold, nonstick skillet coated with cooking spray. Place the skillet over medium-low heat. Tear a few slices of American cheese into small pieces and scatter the pieces over the egg (I like using Land O Lakes white American cheese, but any white deli-sliced American would probably suffice - just don't use individually wrapped singles which have a weird flavor, a gross plastic texture, and make me nervous just thinking about all that unnecessary packaging). A few grinds of black pepper and you're ready to give the whole thing a stir.

At this point you let them set for a few seconds then give the eggs a good stir. Continue this pattern of setting and stirring until the eggs begin to form small curds. Keep stirring all the eggs to the middle of the pan and chopping them up with the spatula. The eggs are done when they are all pretty much set and just glistening slightly. I suggest spreading them on some good toasted and lightly buttered bread (or english muffins, bagels, etc).

______________________________

Creamy Cheesy Scrambled Eggs
About 10 minutes - Serves 2
  • 4 eggs
  • 3 slices white American cheese
  • fresh ground black pepper
  • cooking spray
  1. Scramble the eggs in a small bowl
  2. Coat a medium nonstick skillet with cooking spray
  3. Pour the eggs into the skillet and set it over medium-low heat
  4. Tear the cheese into small pieces and scatter it over the egg
  5. Grind pepper over the eggs (I use about 6 twists on my pepper grinder which is a little over 1/8 of a teaspoon)
  6. Stir to combine everything, the cheese should start to melt a bit as you stir
  7. Allow the eggs to set for about 30 seconds, then stir very well, continue this process
  8. As the eggs begin to cook, stir them towards the center of the pan and chop them into bits with your spatula - the idea is to not have any large curds of egg
  9. When the eggs are chopped into uniform consistency and just slightly glistening, they are done, serve immediately

Saturday, March 29, 2008

Tunisian Vegetable Stew

Until I Googled it a few minutes ago, I had no idea where the country of Tunisia was (turns out it was, and still is, in northern Africa - I was thinking Asia somewhere), and I know pretty much nothing about the country's cuisine. What I do know is that I have a recipe called Tunisian Vegetable Stew, and it's delicious. Whenever I'm in the mood for something that tastes different than pretty much everything else I cook, something that is loaded with interesting flavors and textures, this stew fits the bill. I got this recipe, along with a few others, from my friend John, and I must admit I was skeptical the first time I read it. Cabbage, chick peas, tomatoes, cinnamon, cayenne, currants, lemon, feta, almonds...it sounded like the most outlandish combination to me, but does it ever work.

Among the many qualities of this particular dish, I really appreciate it for both its healthfulness and its ease of preparation. Start to finish it takes only about 30 to 40 minutes, making it perfect for a weeknight meal. Leftovers reheat beautifully for a wonderful lunch, just remember to bring along some extra feta and almonds. Easy, healthy, and delicious, what more do you need?
______________________________

Start by heating the olive oil in a large saucepan (at least 3 quart) and cooking the onion until softened, about 5 minutes. You then toss in the cabbage, sprinkle it with salt, and cook it for another 5 minutes.

Add the green peppers, coriander, turmeric, cinnamon, and cayenne. Stir to combine and cook for 1 minute. You should smell the cinnamon almost immediately. Stir in the tomatoes, chick peas, and currants. Bring to a simmer, cover, and cook for 15 minutes.

Stir in the lemon juice and season with salt. Serve in bowls topped with feta and toasted almonds.

______________________________

Tunisian Vegetable Stew (adapted from Moosewood Restaurant Cooks at Home)
About 40 minutes - Makes 4 servings
  • 1 medium onion, thinly sliced (about 1 1/2 cups)
  • 1 tablespoon olive oil
  • 3 cups thinly sliced cabbage
  • 1/2 teaspoon of salt
  • 1 large green bell pepper, cut into thin strips
  • 2 teaspoons coriander
  • 1/2 teaspoon turmeric
  • 1/4 teaspoon cinnamon
  • 1/8 teaspoon cayenne (1/4 teaspoon if you want a little more heat)
  • 1 28 ounce can crushed tomatoes
  • 1 16 ounce can chick peas, rinsed and drained
  • 1/3 cup currants
  • 1 tablespoon fresh lemon juice
  • 1/2 teaspoon salt
  • 1 cup feta cheese
  • 1 cup slivered almonds, toasted
  1. Spread 1 cup of slivered almonds on an ungreased cookie sheet and toast in a 350 degree oven for 10 to 12 minutes, until almonds are fragrant and slightly browned, set aside
  2. Heat the olive oil over medium heat for 4 minutes
  3. Add the onions and cook until softened, about 5 minutes
  4. Add the cabbage and 1/2 teaspoon salt, cook 5 minutes, stirring occasionally
  5. Add the green pepper, coriander, turmeric, cinamon, and cayenne, stir to combine and cook for 1 minute
  6. Stir in the tomatoes, chick peas, and currants
  7. Bring the stew to a simmer, cover and cook for 15 minutes until the vegetables are tender
  8. Stir in the lemon juice and 1/2 teaspoon of salt
  9. Ladle stew evenly into 4 bowls and top with 1/4 cup each of feta cheese and toasted almonds


Wednesday, March 5, 2008

Red, Gold, Black, and Green Chili

I never would have been able to break away from my meat-centric view of dinner if it had not been for some good recipes. When I first started cooking on a regular basis (which not coincidentally, was when I moved out of my parent's house), I had the good fortune of receiving some excellent recipes from my friend John. Many of these recipes introduced me to exotic (at least to me at the time) ingredients like turmeric and bulgur, as well as such cooking concepts as different textures in food and brightening up flavors with acids at the end of cooking. More importantly they broke me out of my narrow cooking frame of reference. Recipes that I would have dismissed out of hand before because I thought they had strange flavor combinations or unfamiliar ingredients I was now ready to accept and try. I was fortunate to have such a good influence during my formative cooking period.

Since that time I've come to know John as a food lover on par with myself (and more so in some respects). Somebody who appreciates well-made food, who really considers ingredients and the effects they have on a finished dish, and who is willing to give almost anything a try. From him I picked up the idea that cooking is much more than simply being able to follow a recipe, that the more command you have over ingredients and techniques, the more likely you are to prepare excellent food to your particular tastes. He also showed me that it is possible to tackle seemingly long or complex preparations at home if you're just willing to try (and that it is often worth the time to do so). John has passed more than a few good recipes my way over the past 7 years, but some of those originals are still staples in my repertoire, and none more so than Red, Gold, Black, and Green Chili.

When it comes to healthy eating, it's tough to beat this chili. It's loaded with vegetables (green peppers, tomatoes, and corn), whole grain (bulgur wheat), and protein (red and black beans), and most importantly, it tastes so good, you won't miss the meat (and neither will your heart). It even looks amazing. This chili is easy enough to make on a weeknight, as it comes together very quickly once the chopping is done and the cooking starts, but why not make it on the weekend so it can sit a few days and get even better? Make it Sunday morning, eat it 2 times for dinner during the week, or take it for lunch. Put leftovers into a tortilla for a quick burrito, or put a little in the middle of an omelet for something different.
______________________________

I've adapted this recipe slightly over the years to get it just how I like it, and that's the way I'll present it here, but nothing is set in stone (especially spice types and amounts) so feel free to experiment. The recipe begins with mise en place. Peel, seed, and chop everything, measure out your bulgur, spices, and water, rinse and drain the beans, then get the bulgur cooking.

Heat the oil in a large pot and then add the onions, garlic, and spices. The recipe calls for 1/4 teaspoon of cayenne pepper, which gives a mild but noticeable heat that builds as you eat. If you like spicy chili, I would increase it to 1/2 teaspoon. Cook, stirring occasionally, until the onions begin to soften, about 5 or 6 minutes.

Add the green peppers and cook for 2 minutes then stir in the tomatoes. The original recipe called for a can of chopped tomatoes but I use crushed because I like the chili to be a little more saucy. If you'd prefer less sauce, and more chunks of vegetables, by all means use chopped tomatoes (and if you're making this in the summer, buy some fresh tomatoes and forgo the can altogether).

Stir in the corn and beans, and check the bulgur (which should be cooked but still a bit chewy at this point).

Add the bulgur to the pot, stir and gently heat everything a few minutes to combine all the flavors. Add salt to taste (I usually don't add any, but when I do, I start with 1/2 tsp and go from there).

The chili is good by itself (and healthiest), but it certainly can be dressed up however you like. Cheese, sour cream, chopped fresh jalapenos or onions, or some lime juice would all be good additions. Regardless of what I put on top, I like to serve it with a few tortilla chips.

________________________________

Red Gold Black and Green Chili (adapted from Moosewood Cooks at Home)
About 40 minutes - Makes about 10 cups (5 dinner size portions)
  • 1/2 cup bulgur
  • 1 1/2 cups hot water
  • 1 tablespoon vegetable oil
  • 3 cups chopped onions (about 1 1/2 medium onions)
  • 3 garlic cloves, minced or pressed
  • 1 1/4 teaspoon ground cumin
  • 1 1/4 teaspoon chili powder
  • 1/4 teaspoon cayenne pepper (increase if you want spicy chili, but watch out)
  • 2 green bell peppers, chopped into 1/2 inch pieces
  • 28 ounce can of crushed tomatoes
  • 2 cups frozen cut corn
  • 1 14 ounce can of black beans, drained and rinsed (about 1 1/2 cups)
  • 1 14 ounce can of red beans, drained and rinsed (about 1 1/2 cups)
  • salt to taste
  • OPTIONAL - shredded Monterey Jack or cheddar cheese, sour cream, sliced limes, chopped fresh cilantro, chopped fresh jalapeno peppers, chopped fresh onions, tortilla chips
  1. Place bulgur and hot water in a small saucepan, bring to a boil, reduce heat, cover and simmer
  2. Heat the oil in a large saucepan over medium heat
  3. Add the onions, garlic, cumin, chili powder, and cayenne, cook until the onions begin to soften, about 5 minutes
  4. Add the green peppers and cook for 2 minutes (3 if you want the peppers softer)
  5. Add the crushed tomatoes and stir to combine
  6. Stir in the corn and beans
  7. Check the bulgur, it should be cooked but still a bit chewy, add it along with its liquid to the chili
  8. Cover and simmer over low heat for 5 minutes
  9. Add salt to taste (start with 1/2 teaspoon and go up from there in 1/2 teaspoon increments)
  10. Serve plain, or topped with any combination of cheese, sour cream, lime juice, cilantro, jalapenos, onions, and tortilla chips
*This chili is better made in advance and allowed to sit for at least 1 day before gently reheating and serving*