Showing posts with label Grains. Show all posts

Monday, August 9, 2010

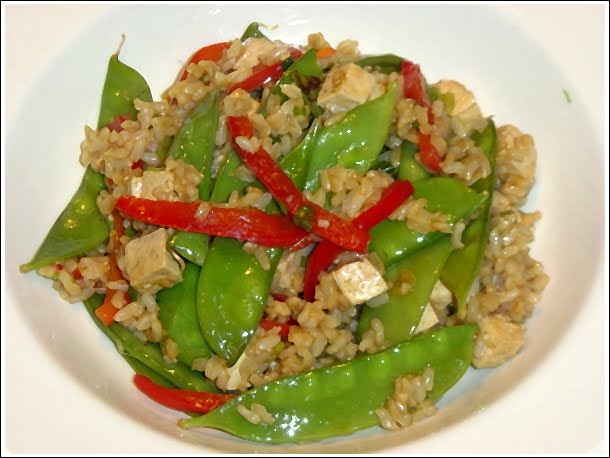
Veggie Fried Rice With Tofu

This excellent vegetable fried rice recipe comes from one of the many Moosewood cookbooks, I'm not sure which one though, because it is not one of the ones that I own. The recipe was passed to me from my friend John, who as I may have mentioned before, is no slouch in the kitchen, and is considered (by me) to be one of the most reliable recommenders of recipes (or practically anything else) around these here parts. Red peppers and snow peas provide crunch and color, while a sweet/salty/sour/spicy tofu marinade packs a flavorful punch. Relatively light on the prep, this recipe comes together extremely quickly once the cooking starts, and is substantial enough to stand on its own as a meal.

This recipe calls for 4 cups of cooked brown rice. When making fried rice, it is customary to use day-old or leftover rice, which has had time to shed excess moisture. If you try to make fried rice with fresh rice, you will almost certainly end up with too much moisture in the pan and a mushy result. With a little foresight, this should never be a problem. Cooked brown rice freezes exceptionally well, so next time you make a batch, double it and freeze the leftover in a 4 cup portion. You'll be good to go when the urge for fried rice hits you. Just don't forget to defrost it first. If you don't have any frozen rice, just make a batch the day before you plan on cooking. Check out some other great fried rice tips, and another great recipe, at Simply Recipes.
______________________________

First, make the tofu marinade by blending minced ginger root, minced garlic, soy sauce, rice vinegar, brown sugar, dark sesame oil, and chili paste/chili oil/chili sauce in a small bowl. Chop the tofu into 1/2 inch cubes and add it to the marinade, stirring gently. Prep the rest of the vegetables before you start cooking.


Heat a few tablespoons of oil in a large skillet, then add the peppers and cook for a few minutes before adding the snow peas along with some water. This is allowed to cook for a few minutes until the water evaporates and the vegetables are tender, but still retain some crispness.


Remove the tofu from the marinade and add it to the skillet, stirring to combine with the vegetables. Add the rice and heat thoroughly. Last, stir in the leftover marinade along with the scallions and you're all done.

______________________________

Veggie Fried Rice With Tofu (adapted from a Moosewood cookbook)
Serves 4 as a small main or 6 as a side - about 30-40 minutes

Marinade
  • 1 Tbsp minced ginger root
  • 4 garlic cloves, minced
  • 1/4 cup soy sauce
  • 2 Tbsp rice vinegar
  • 2 tsp brown sugar
  • 2 Tbsp dark sesame oil
  • 1 tsp chili sauce OR 1/2 tsp chili paste OR a splash of chili oil
  • 1 lb of extra-firm tofu
  • 3 Tbsp peanut or vegetable oil
  • 2 medium red peppers, cut into thin strips
  • 6 ounces snow peas, stemmed
  • 1/4 cup water
  • 4 cups cooked brown rice
  • 2/3 cup chopped scallions
  • chopped toasted almonds or pecans (optional)
  1. In a small bowl, combine marinade ingredients and mix well
  2. Cut tofu into 1/2 inch cubes and add to marinade, stirring gently
  3. Prepare the remaining ingredients (slice peppers, trim peas, chop scallions, measure rice)
  4. Heat oil in large skillet over medium high heat for 3 to 4 minutes, oil should be shimmering but not smoking
  5. Add the peppers and stir fry for 3 minutes
  6. Add the snow peas and water and continue to cook until water has evaporated, about 3 more minutes - the vegetables should be somewhat tender, but retain some crispness
  7. Remove the tofu from the marinade with a slotted spoon, and stir it into the skillet
  8. Add the rice and heat thoroughly, about 3 minutes
  9. Pour on the leftover marinade, add the scallions, and stir to combine
  10. Serve immediately garnished with the chopped nuts if you choose to use them

Wednesday, January 13, 2010

Mushroom Barley Stew

The frigid heart of winter is a time for stew. Combining the heartiness of a meal, with the warm deliciousness of soup, there's nothing quite like a bowl of stew on a cold day. Just imagine hearty chunks of potato, earthy mushrooms, some carrots for sweetness, the chewy toothsomeness of barley, all in a rich broth with hints of sage...(this is starting to sound like a Chunky Soup commercial)...sounds good, right? This is a great recipe to make on a Sunday afternoon, then stow away in the fridge for easy weeknight meals, or even weekday lunches. As with pretty much all soups and stews, this one is definitely better the next day. Serve with some nice warm crusty bread, or fresh baked biscuits, and you'll want for nothing on those frigid winter nights.
______________________________

This recipe really couldn't be easier. Prep all the ingredients then heat the oil in large (at least 5 quart) pot over medium heat. Add onion, carrot, celery, garlic, potatoes, sage, salt and pepper.


Cook until the veggies start to brown, stir in the mushrooms and cook an additional 5 minutes. Add the barley, and cook, stirring frequently for 2 more minutes. Add the stock and/or water, bring to boil, reduce heat, cover and simmer for 30 more minutes. Salt and pepper to taste and voila! Stew!

Don't like barley? Try brown rice, quinoa, wheat berries, couscous, bulgur, or whatever grain suits your fancy. Feel free to experiment with herbs as well, substituting rosemary or thyme for the sage, or use them in combination. Not a mushroom eater? Leave em' out. Try some butternut squash or sweet potato in there. So many possibilities!
______________________________

Mushroom Barley Stew (~1 hour 15 minutes - 6 to 8 large servings)
  • 4 TBS olive oil
  • 2 cups chopped onion
  • 4 medium waxy potatoes, peeled and cut into chunks (cut lengthwise into quarters, cut each quarter into 3 pieces)
  • 4 ribs celery, chopped
  • 4 carrots, peeled, halved lengthwise, and chopped into chunks
  • 8 cloves garlic, peeled
  • 1 tsp dried sage
  • 1/2 teaspoon salt
  • 1/2 teaspoon fresh ground black pepper
  • 4 cups sliced mushrooms (any type, I like a combo of baby bella and button)
  • 2/3 cup uncooked pearled barley
  • 6 cups vegetable stock (can use water, or a water/stock combo)
  1. Heat oil in large pot over medium heat (pot should be at least 5 quarts)
  2. When oil shimmers, add onion, potato, celery, carrot, garlic, sage, salt, and pepper
  3. Stir to combine and cook, stirring occasionally, until the vegetables start to brown, about 10 minutes
  4. Stir in the mushrooms and cook for 5 more minutes
  5. Stir in the barley and cook, stirring frequently, for 2 minutes
  6. Add the stock/water, raise the heat, and bring to a boil
  7. Lower heat, cover and simmer for 30 minutes
  8. Taste then season with additional salt* and pepper to taste
*If you used water or a homemade stock that is low on salt, you might need to add as much as a teaspoon or more of salt (add 1/4 teaspoon at a time, tasting as you go). Store-bought stocks are often quite high in salt, so taste and go from there.

Saturday, March 21, 2009

Brown Rice and Black Bean Soft Tacos

A few weeks ago I inadvertently recreated one of my old favorite fast food items. I had not eaten anything from any fast food restaurant in at least 5 years, probably even longer, but nonetheless I found myself experiencing a bit of food déjà vu. I was pretty sure I had never made a burrito (actually it was more of a taco due to over-stuffing) with this exact combination of ingredients, but I knew I had eaten it before. Then it struck me, the Seven Layer Burrito from Taco Bell - rice, beans, sour cream, guacamole, cheddar cheese, lettuce, and tomato (I looked it up). Of course, my dinner was slightly different as I had mashed avocado rather than guacamole, crumbled goat cheese instead of cheddar, and salsa instead of tomato, but the essence remained the same. Fond fast food memories came flooding back, making me feel all nostalgic, as well as slightly nauseous, for times spent with good friends driving around and...well, eating at fast food restaurants.

The amazing technique for cooking the brown rice used in this recipe comes from Cook's Illustrated Magazine, and it has been a revelation for me. I know it sounds pathetic, but I have never been able to cook brown rice with any type of consistency. This technique has you bake the rice in the oven, which was completely new to me. I have made brown rice this way at least ten times now, and its always come out exactly the same, that is to say, absolutely perfect. I'll never simmer it on the stove top again. The only down side is that you need to start 1 hour and 20 minutes before you want to use the rice, so some planning ahead is definitely required. Alternatively you can make a large batch of rice in advance, and freeze it in smaller portions to defrost and reheat as needed.
______________________________

Start by preheating your oven to 375 degrees. Measure out 1 1/2 cups of brown rice into an 8-inch, oven safe baking dish. Measure out the spices and bring the water and oil to a boil.

Stir the spices into the boiling water and pour it over the rice. Pouring the water into the dish will move the rice around, so just use a spoon to coax it back into a nice even layer.

Cover tightly with a double layer of foil and place into the oven for 1 hour.

While the rice cooks, open up a can of black beans, rinse them and drain them well. When the rice is done, make sure to uncover it carefully or you can get a pretty nasty steam burn.

Fluff the rice with a fork, and place the foil loosely back over the top for 5 minutes.

While you are waiting for the rice, mash the avocado. You don't want to do this too far in advance because the avocado tends to discolor quickly. Stir the beans into the rice and allow it to sit uncovered for a few more minutes.

To assemble your soft tacos, start with a medium size (about 8 inch) flour tortilla. Spread as much sour cream as you like in the middle (I generally use about 1 tablespoon per taco).

Spoon approximately 1/8 of the rice mixture onto the sour cream and top with some goat cheese. I got the idea for goat cheese in tacos from this great recipe by Rick Bayless, the undisputed king of authentic Mexican cuisine in America. I know goat cheese sounds a little weird for tacos, but I think it adds a really nice tangy flavor and creaminess that you don't get from grated cheddar or jack cheese, but you can use whatever you like of course.

Next comes a little of your favorite salsa spooned over the top and a generous dollop of mashed avocado. If tomatoes are in season, I'm sure some fresh, diced tomato would be great, but if they're not in season, skip the tomato and use the salsa.

Top with some nice crispy romaine lettuce and you're ready to eat.

______________________________

Brown Rice and Black Bean Soft Tacos
1 hour 30 minutes (about 10 minutes if rice and beans is cooked in advance) Makes 8 to 10 tacos
  • 1 1/2 cups long grain brown rice
  • 2 1/3 cups water
  • 2 teaspoons vegetable oil
  • 1/2 teaspoon salt
  • 1 1/2 teaspoons chili powder
  • 1/2 teaspoon cumin
  • 1/2 teaspoon oregano
  • 1 15 ounce can black beans, rinsed and drained well
  • 8 to 10 flour tortillas
  • sour cream
  • 4 ripe avocados
  • crumbled goat cheese
  • your favorite salsa
  • romaine lettuce, washed, dried, and cut into bite size pieces
To make the rice and beans:
  1. Adjust oven rack to middle position and heat oven t0 375 degrees
  2. Place rice in 8-inch square, oven safe baking dish
  3. Place water and oil in small saucepan and bring to a boil
  4. Stir spices into boiling water
  5. Pour boiling water over rice, smooth rice into an even layer with a spoon
  6. Cover tightly with a double layer of foil
  7. Place into oven for 1 hour
  8. Remove from oven and carefully uncover
  9. Fluff rice with fork, then place foil loosely over top and allow rice to sit for 5 minutes
  10. Uncover, mix in beans with fork, and allow the rice to sit uncovered for 5 more minutes
To assemble the tacos:
  1. Prepare flour tortillas according to package directions
  2. Place a tortilla on a plate and spread about 1 tablespoon of sour cream evenly over the middle of the tortilla
  3. Place 1/8 to 1/10 of the rice and beans (about 1/2 cup) onto the tortilla
  4. Top the rice and beans with a few crumbles of goat cheese (about 1 to 2 tablespoons)
  5. Place a few spoons of salsa on top of the cheese (about 1 to 2 tablespoons)
  6. Top the salsa with a generous dollop of mashed avocado (about 1/3 cup or more if you like)
  7. Sprinkle a few pieces of lettuce on top
  8. Repeat as many times as you like
_______________________________

Brown rice is much healthier for you than white, but it takes considerably longer to prepare. The cooking method in this recipe makes delicious rice, is very simple, and is hands off for almost all of the cooking time leaving you free to prepare the rest of your meal. Use the brown rice cooking technique above whenever you need brown rice, simply omit the chili powder, cumin, oregano, and beans.

Saturday, February 9, 2008

Shrimp and Scallop Risotto

If pressed I would have to say that rice is my starch of choice (why I'd ever be "pressed" about that I'm not really sure). When faced with a choice between pasta, potato, corn, or rice, I will almost invariably choose the rice dish. I even love eating the plain white rice that comes with an order of Chinese take out - nothing else really tastes quite like it. The many varieties of rice make it an extremely versatile ingredient. It can be a side dish or the dish itself. Savory or sweet, rice can pretty much do it all. And then there is risotto.

Risotto to me is the ultimate expression of what rice can be. Rich and luscious without being too heavy, it is an extremely satisfying meal. A simple risotto makes a great side dish for virtually any meat or fish, and a more dressed up risotto makes an amazing meal on its own. The best thing about risotto though is that it can be made, and made excellently, at home. Once the basic technique is mastered, you can turn out better-than-restaurant quality risotto with no problem whatsoever. Risotto is both delicious and impressive, and should be a part of any home cook's repertoire.

There are tons of different risotto recipes out there, but practically all of them are variations on the same theme: saute the aromatics in oil or butter, add the rice to coat, then slowly ladle in a small amount of stock and stir until it is absorbed, repeating until the rice is cooked and attains its full creaminess. A few things are essential here, first the rice should be a medium-grain rice, preferably Arborio, which is easy to find in most grocery stores. Arborio rice has a higher starch content than regular long-grain white rice, which is what gives the risotto its creaminess. Second, the stock must be added slowly, about 1/2 cup at a time and stirred until it is absorbed. This is what allows the creaminess of the starches to develop. Great risotto is not hard to make, but you must have all your ingredients ready to go before you start (good mise en place is always a good idea when cooking!), and you also have to be ready to stand at the stove for about 30 minutes. The effort is definitely worth it.
______________________________

Shrimp and Scallop Risotto is a recipe I adapted from Jamie Oliver's Prawn and Pea Risotto with Basil and Mint as a final course for my Christmas Eve dinner the past two years (an extremely filling final course). The first year I cooked the whole thing from start to finish between courses, which was a little slow, so this past year I looked into precooking as an alternative. With a little research I uncovered a technique which I have incorporated into this recipe that allows for partial precooking. If you choose this option and make the risotto ahead of time, you can finish the dish later that day or the next day in about 10 minutes and nobody will be the wiser because it comes out just as good as if you cooked it all in one go. This particular recipe is loaded with shrimp and scallops and has been a huge hit every time I have made it. If you want the fish to take more of a back seat to the rice, cut the amounts of shrimp and scallops in half.

Prep all the ingredients then heat the oil in a large saucepan over medium heat. Bring the stock to a simmer in another pot. When the oil is warm, saute the onions, celery, and garlic until just soft, about 6 minutes.

Add the rice, season with a little salt and freshly ground black pepper, and stir to combine. Raise the heat to medium-high and stir the rice around for 1 minute. Add the wine and keep stirring until it is all absorbed, about 3 minutes.

One of the things you need to know when making risotto is when to add more liquid to the pot. A good rule of thumb is to drag the spoon down the middle of the pot making a divide in the rice and see how long it takes the rice to fill it in. If the rice flows immediately into the space left in the wake of the spoon, it needs more stirring. If you can see the metal bottom of the pan (see the picture below) then its ready for more liquid. Once the wine is absorbed, add about 1/2 cup of hot stock and stir until it is absorbed, again about 3 minutes. As you continue to add stock and stir, you will notice the rice grains beginning to swell, and see the creaminess developing.

After about 20 minutes of adding stock and stirring, taste the rice. It should be soft but have a slight bite, but it should not be hard or feel gritty between your teeth. If this is the case, continue adding stock and stirring for a few more minutes. It usually takes me about 25 to 30 minutes to cook the risotto the way I like it once I begin adding liquid. When the rice is done, stir in the shrimp, scallops, and peas. Simmer for 1 minute (2 if you like your shrimp and scallops a little more well done).

At this point remove the risotto from the heat and gently stir in the butter, basil, and lemon juice. Immediately cover the pot and let it sit for 3 minutes. Jamie Oliver says this stop gives the risotto a chance to achieve its maximum creaminess, and I'm inclined to agree with him. As soon as the time is up, place the risotto into bowls and serve immediately.

______________________________

Shrimp & Scallop Risotto
About 30 minutes prep and 40 minutes to cook - Makes 4 dinner-size portions

Ingredients:
  • 6 cups of stock (fish, chicken, or veggie)
  • 1 tablespoon olive oil
  • 1 medium onion, finely chopped (between a mince and a dice)
  • 2 cloves garlic, minced
  • 4 ribs of celery, finely chopped
  • 14 ounces Arborio rice
  • salt and pepper to taste
  • 1 cup white wine
  • 1 cup frozen green peas
  • 1 lb peeled, uncooked shrimp cut in half lengthwise
  • 1 lb sea scallops cut into quarters
  • 12 fresh basil leaves, chopped
  • 1 lemon, juiced
  • 4 tablespoons butter
  1. Heat stock (reserve 1 1/2 cup for finishing risotto if you're precooking)
  2. Heat oil in large saucepan over medium heat
  3. Add onion, garlic, celery and saute until just soft, about 6 minutes
  4. Add the rice, season with salt and pepper (about 1 tsp salt, 1/4 tsp pepper or to taste), raise heat to medium-high, and stir for 1 minute
  5. Add the wine and keep stirring until it is all absorbed, about 3 minutes
  6. Add about 1/2 cup of hot stock and a bit of salt (1/4 tsp), lower the heat back to medium, and stir until liquid is absorbed...continue for about 20 to 25 minutes until the rice is soft with just the slightest bite to it
  7. Stir in the shrimp, scallops, and peas and simmer for 1 to 2 minutes
  8. Remove from heat, gently stir in the butter, basil, and lemon juice
  9. Place lid on pan and allow it to sit for 3 minutes
  10. Give one final stir, place into bowls and serve immediately
If you're precooking the risotto, stop cooking during step 6 when the rice is not quite done, remove the risotto from the pan, spread it in a thin layer on a cold cookie sheet, cover and refrigerate. When ready to continue cooking, place a cup of stock in a pan and bring to a simmer, add the risotto and stir until the liquid is absorbed (3 to 5 minutes). If the rice is still not quite done, add the rest of the stock and finish cooking. Continue on to step 7.

Tuesday, January 15, 2008

Paella

Way back in high school, my friend Jeff and I used to talk about reading classic books. We'd walk through the Fiction and Literature section of Barnes & Noble, pointing out all the books we might like to read someday (we were very cool high school kids). Then Barnes & Noble took somewhat of a back seat to beer and college. Since then Jeff has read a bunch of those classics, as he has morphed from a chemical engineering major to an aspiring writer/teacher, but I felt I was finally ready to give it a go as well. So this past summer we belatedly began our book club, with a focus on classic books. The club has experienced robust growth over the past months, blossoming to include a 3rd quasi-member.

Our first book was Herman Melville's masterpiece, Moby Dick, which contained an amusing chapter dedicated to chowder. Ishamael and his new friend Queequeg find themselves in the Try Pots Inn facing the question, "Clam or Cod?" Ishamael ponders how a single, cold clam can serve as dinner for two, and is pleasantly surprised...

But when that smoking chowder came in, the mystery was delightfully explained. Oh, sweet friends! hearken to me. It was made of small juicy clams, scarcely bigger than hazel nuts, mixed with pounded ship biscuit, and salted pork cut up into little flakes; the whole enriched with butter, and plentifully seasoned with pepper and salt. -Ishamael narrating from Moby Dick

Ishamael enjoys the clam chowder so much, that he has a bowl of cod chowder as well. When it came time to have our first book club meeting, Jeff and I discussed Moby Dick in what we thought was a very fitting way - over a bowl of curried cod chowder (a recipe I'll post the next time I make it because it is really good).

We recently completed our second book, Hemingway's For Whom The Bell Tolls, which takes place in pre-WWII Spain. Like all good clubs, ours began establishing tradition right away, beginning with eating something somehow related to the book at our meetings. At one point in the For Whom The Bell Tolls, somebody traps two large rabbits which were made into stew (and later on some tasty sandwiches). I didn't think my wife would go for that, so Jeff suggested paella (the only Spanish dish he knew).

Now the only thing I knew about paella is what I learned in the classic Seinfeld episode "The Raincoats"...

Kramer: Have you ever had really good paella?
Morty: Not really.
Kramer: Oh, it’s an orgiastic feast for the senses. A festival of sights, sounds and colors.

...so I did a little research. Paella is a traditional rice and saffron dish that is usually cooked on a stove top or over an open fire in shallow pans. The recipe I settled on was a bastardized version from America's Test Kitchen that uses a dutch oven pot, and does some of the cooking in the oven. I'd had great success with Test Kitchen recipes in the past, they are always good because they are well researched and tested, and this time was no exception. I modified the recipe a bit by replacing the chorizo with a little butter and salt (my wife doesn't eat sausage in any form), and the mussels with sea scallops. The only thing I didn't like about this recipe was that the cooking instructions are in small paragraphs, which tends to confuse me and I lose my place. I re-wrote it in a more step by step fashion which I included at the bottom of this post.

This is not a quick and easy recipe. It's not hard either, but good mise en place is essential as there are quite a few steps to this recipe and not much time to prep ingredients in between. Things move in and out of the pot quite a bit, so have some clean bowls or plates on hand as you cook.

First preheat your oven to 375 degrees, prep the ingredients, season the shrimp and scallops with salt, pepper, oil, and garlic, and season the chicken with salt and pepper.

You are supposed to cook the pepper strips in a bit of oil next, but I somehow skipped this step. I didn't realize this until I put the chicken in the pot, so I ended up cooking the peppers in a separate skillet. Both the chicken and peppers are cooked until browned (or bubbly and slightly blackened in the case of the peppers) and removed from the pot. To the pot add some butter, salt, and a little more oil (to bring the total fat in the pan to about 2 tablespoons). The onions go in next for about 3 minutes, and are then joined by the garlic and cooked until fragrant.

Add the tomato to the pot and cook until the mixture thickens and darkens slightly, 1 to 2 minutes, then stir in the rice and cook for about 2 more minutes.

At this point the recipe slows down a bit. You add the broth, wine, bay leaf, saffron, and some more salt then bring the mixture to a boil stirring occasionally.

Once it boils you cover the pot and place it in the oven for 15 minutes. Take out the the pot, uncover and scatter the shrimp and scallops over the top of the rice, arrange the pepper strips in a neat pattern, and scatter the peas over everything. Cover the pot and put it back in the oven for 12 minutes. When it comes out again, uncover it and put it over medium-high heat for 2 minutes, then turn the pot 180 degrees and cook for 3 more minutes. This step develops soccarat, a tasty layer of crusty brown rice on the bottom of the pot. Take the pot off the heat, cover it, and let it sit for 5 minutes. Sprinkle some parsley over the top, spoon into bowls, and serve with lemon wedges.

The finished dish was superb and I would encourage anybody to try it. The way the ingredients blend together, with no one flavor dominating, is amazing. The shrimp and scallops were perfectly cooked, as were the chicken and the rice. This recipe looks and tastes impressive, and I would recommend making it when you have a few friends to share in the deliciousness. I would also recommend reading some classics, both Moby Dick and For Whom The Bell Tolls are excellent choices (and a good excuse to make some cod chowder or paella).

______________________________


Paella (ATK dutch oven version modified by Darron)
About 2 to 2 ½ hours to prepare and cook
Feeds 4 to 6 depending on portion

Ingredients:

  • Salt and ground black pepper
  • Olive oil
  • 9 garlic cloves, minced or pressed
  • 1 pound large shrimp, shelled and deveined
  • ½ pound (about 8) large sea scallops
  • 1 pound boneless, skinless chicken thighs, trimmed and cut in half horizontally
  • 1 red bell pepper, stemmed, seeded, and cut into ½ inch wide strips
  • 1 Tbs butter
  • 1 medium onion, chopped fine (about 1 cup)
  • 1 14.5 ounce can of diced tomatoes, drained, minced, and drained again
  • 2 cups Arborio Rice
  • 3 cups low sodium chicken broth
  • 1/3 cup dry white wine
  • ½ tsp saffron threads, crumbled
  • 1 dried bay leaf
  • ½ cup of frozen peas, thawed
  • 2 Tbs chopped fresh parsley leaves
  • 1 lemon, cut into wedges for serving
  1. Heat oven to 375
  2. Toss shrimp with 1/4 tsp salt, 1/4 tsp pepper, 1 Tbs oil, 1 tsp of the garlic, refrigerate
  3. Season the chicken thighs with salt and pepper
  4. Heat 2 tsp oil in a large dutch oven over medium-high heat until shimmering.
  5. Cook the pepper strips, stirring occasionally, until the skin begins to blister and turn spotty black, about 3 to 4 minutes, remove peppers from pot and set aside
  6. Add 1 tsp of oil to pot and heat until shimmering
  7. Add chicken pieces in a single layer, cook without moving for 3 minutes, turn and cook for 3 more minutes until brown, remove chicken from pot and set aside
  8. Add 1 Tbs butter and 1 tsp salt to pan, melt
  9. Add enough oil so that in combination with the butter, there are about 2 tablespoons of fat in the pan (probably add about 1 Tbs)
  10. Add the onion and cook, stirring frequently, until softened, about 3 to 4 minutes
  11. Add the garlic and cook until fragrant, about 1 minutes
  12. Stir in the tomatoes, cook until the mixture begins to darken and thicken slightly, about 1 to 2 minutes
  13. Stir in the rice and cook until the grains are well coated with the tomato/onion mixture, 1 to 2 minutes
  14. Stir in the chicken broth, wine, saffron, baby leaf, and ½ tsp salt
  15. Return the chicken to the pot, increase the heat to medium-high and bring to a boil uncovered, stirring occasionally
  16. Cover the pot and put it in the oven for 15 minutes
  17. Remove the pot from the oven and uncover
  18. Scatter the shrimp and scallops over the rice
  19. Arrange the pepper strips into an attractive pattern
  20. Scatter the peas over the top of the shrimp, scallops, and peppers
  21. Cover and return to the oven for 12 minutes
  22. Remove the pot from the oven, place on a burner set to medium-high heat and uncover
  23. Cook for 2 minutes, rotate the pan 180 degrees, and cook for 3 more minutes
  24. Remove the paella from the heat and cover
  25. Allow the paella to stand for 5 minutes
  26. If you can find it, remove the bay leaf, then sprinkle with parsley and serve with lemon wedges